START HERE! Vektor Quickstart Guide 🚀

Thanks for trying out Vektor. There are so many capabilities available to you, ranging from querying, execution, and automating across DeFi. So let's get you started with this guide - follow through these steps and you'll be a Vektor pro in no time!
Contents
Step 1: Add your first labelled address
Step 2: Add some layouts
Step 3: Create your first Layout from scratch using basic functions
Step 4: Access more filtered data using the Quick Actions menu
Step 5: Use Advanced Quick Actions directly from Layout components
Step 6: Submit your first Commands using the Command Line
Step 7: Filter some lists using the built-in function filters
Step 8: Execute some transactions
- Example 1: Sell some ETH for USDC
- Example 2: Lend, Borrow, LP Deposit
- Example 3: Withdraw, Repay, Reduce Liquidity
Step 9: Create some formulaic alerts
Step 10: Work with Vektor's data model
Step 11: Create scheduled Reports
Step 1: Add your first labelled address
All the best stuff in Vektor happens once you've registered an address. We call them Labels. Add a new label so you can start working with it in Vektor.
- Go to the App Toolbar and find the Labels menu.
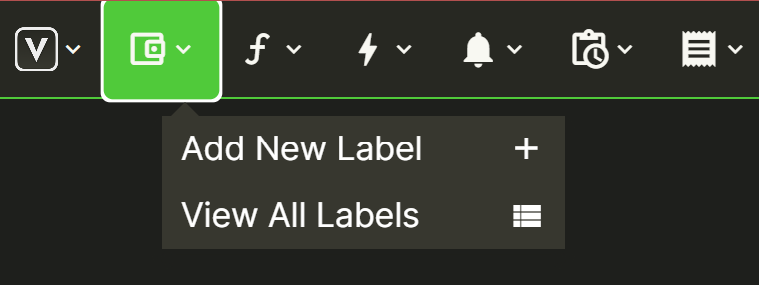
- Select “Add New Label”.
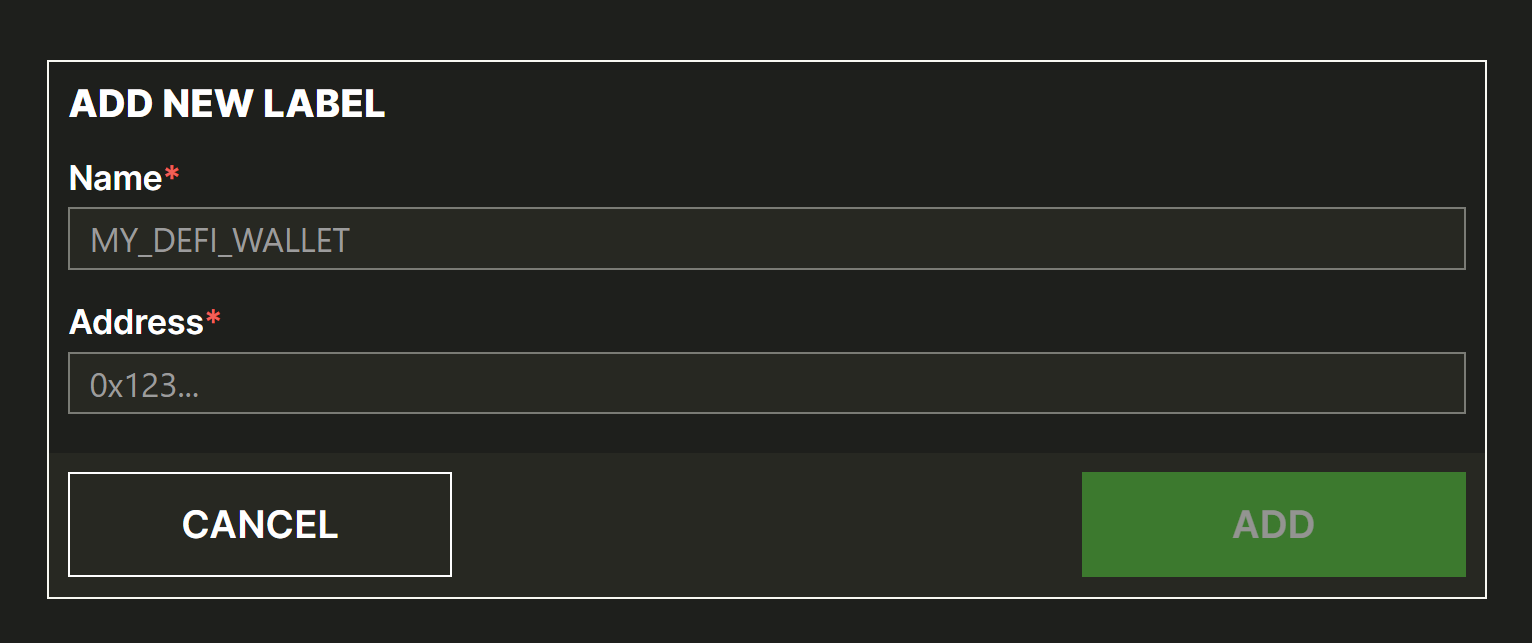
- Choose the name for the label, paste the address and press “Add”.
Repeat the process for all your addresses or watch-only addresses.
Step 2: Add some layouts
In Vektor you can easily build your own modular layouts (i.e. dashboards) using hundreds of built-in components or even your own formulas. To get started though we can choose from a number of pre-built Layout Templates.
- Go to the app toolbar and find the Templates menu.
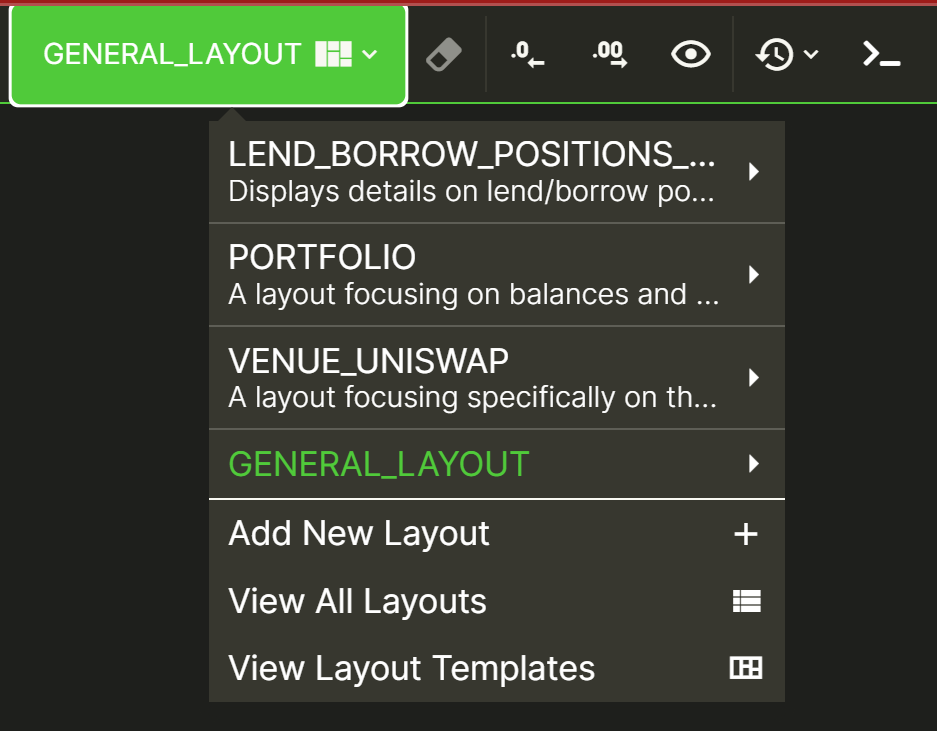
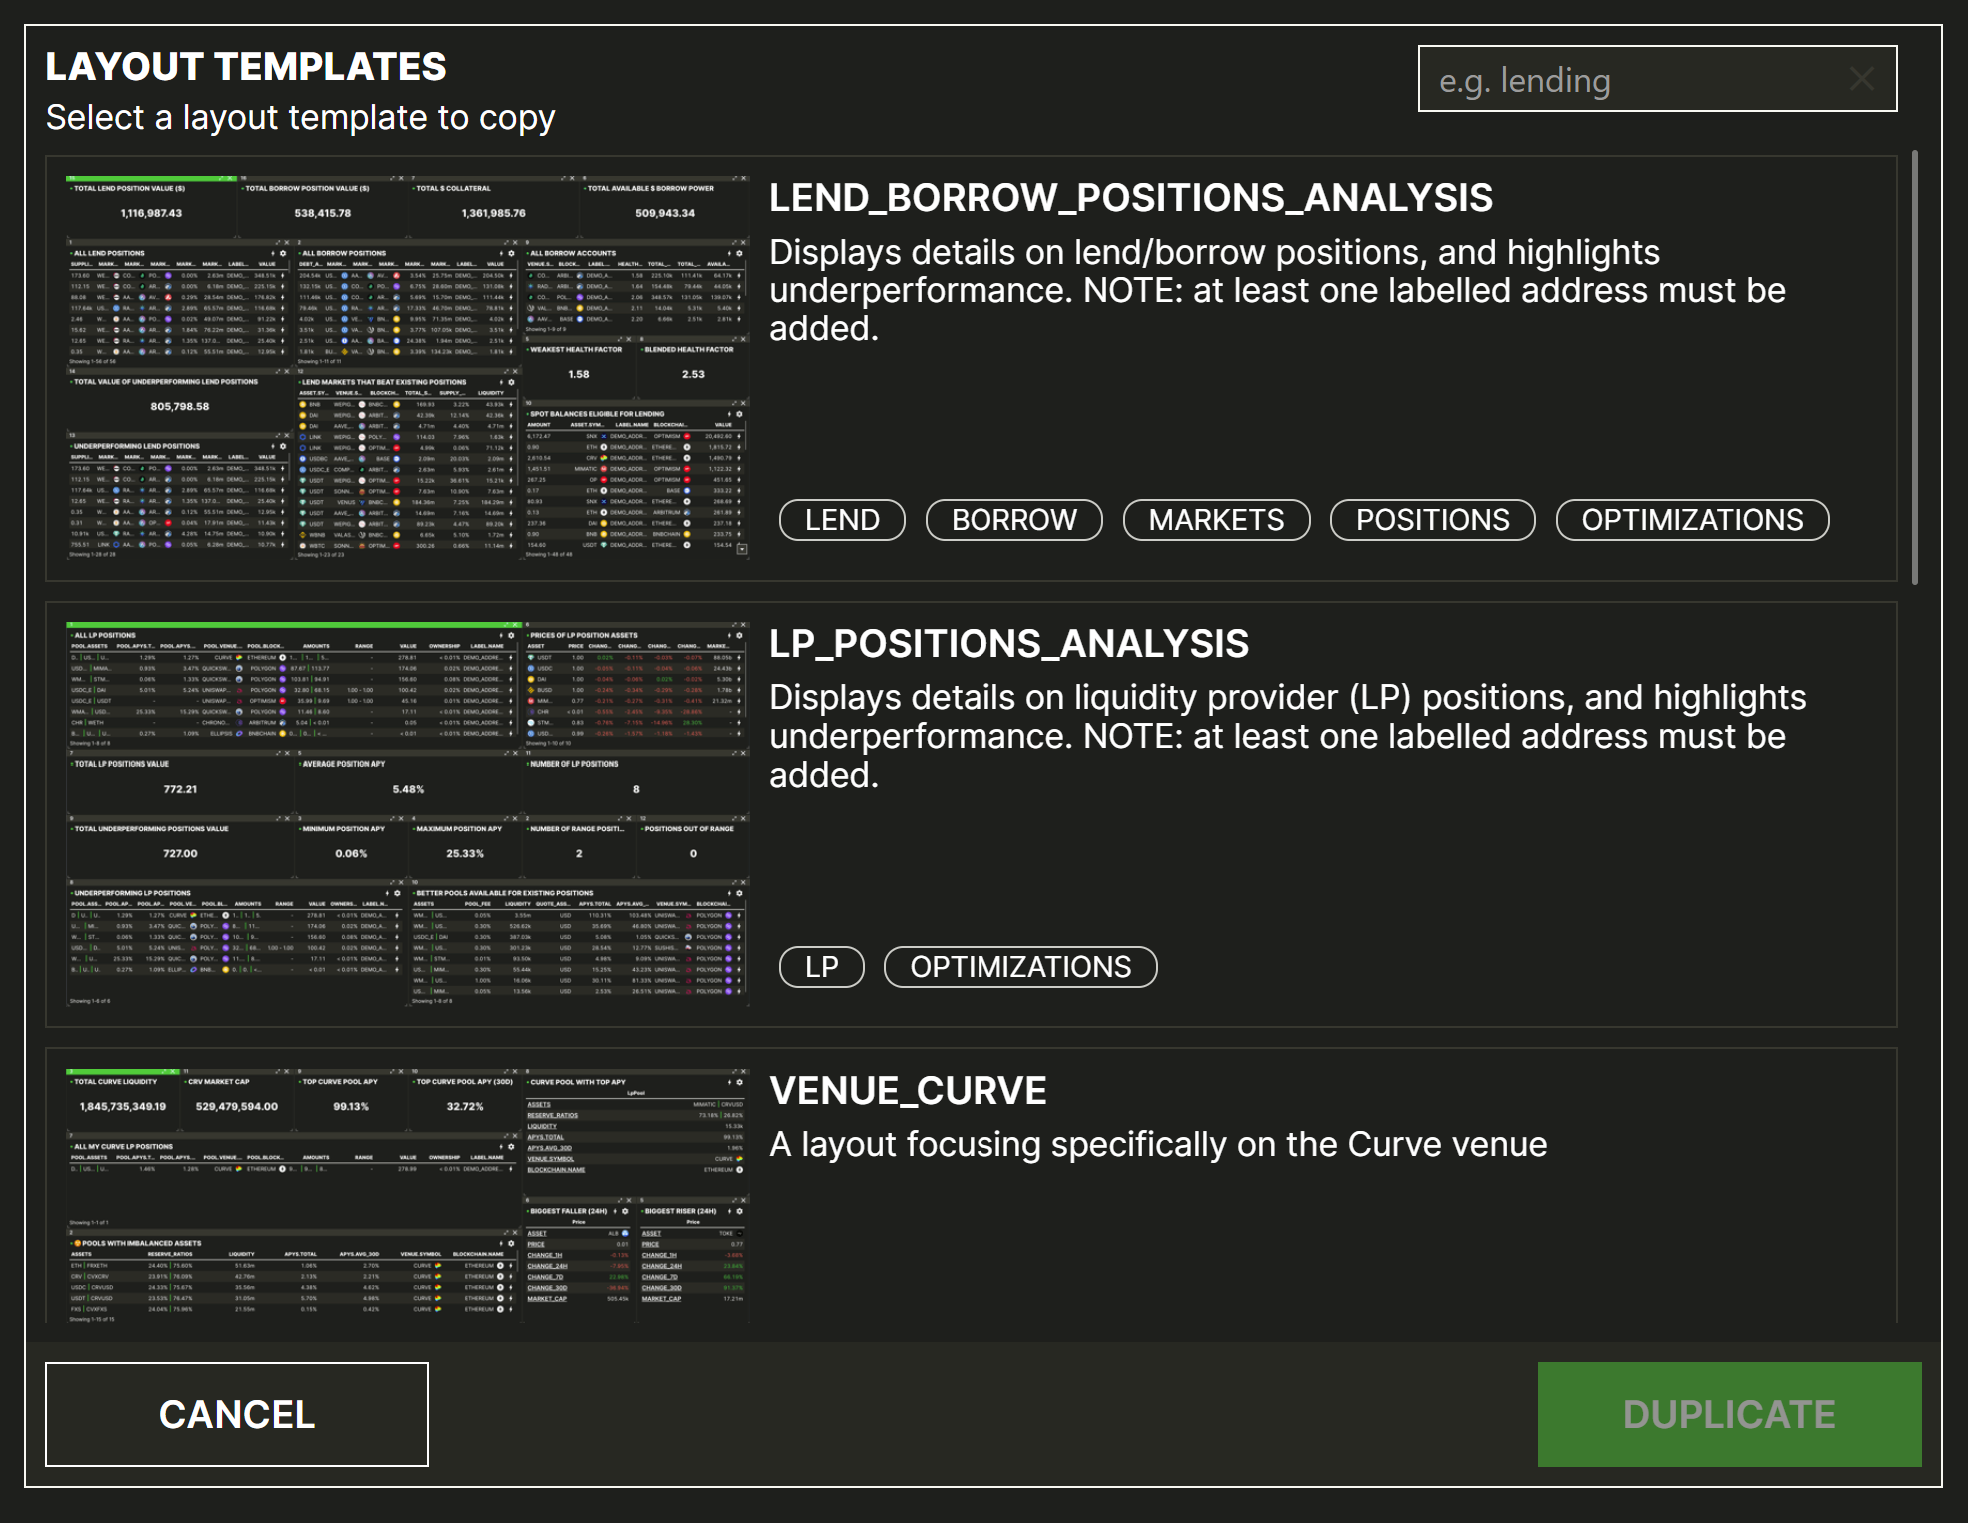
- Select “View Layout templates”.
- Browse the Layout Templates library and duplicate the ones that you prefer.
Step 3: Create your first Layout from scratch using basic functions
Go the Layouts Menu and select “Add new Layout”. This will create a new Layout with a name and description of your choice. Your layout will not appear in the Layout Templates Library by default.
Let's start adding a few components.
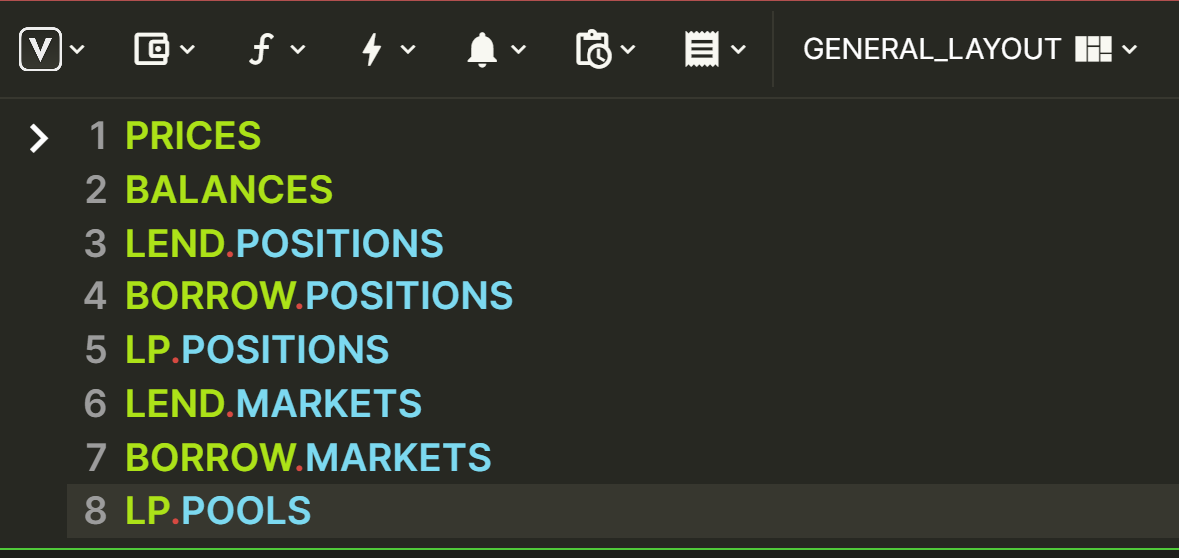
- Go to the app toolbar and find the functions menu.
- In the “Onchain” category select
PRICES - Repeat the process and select
BALANCES
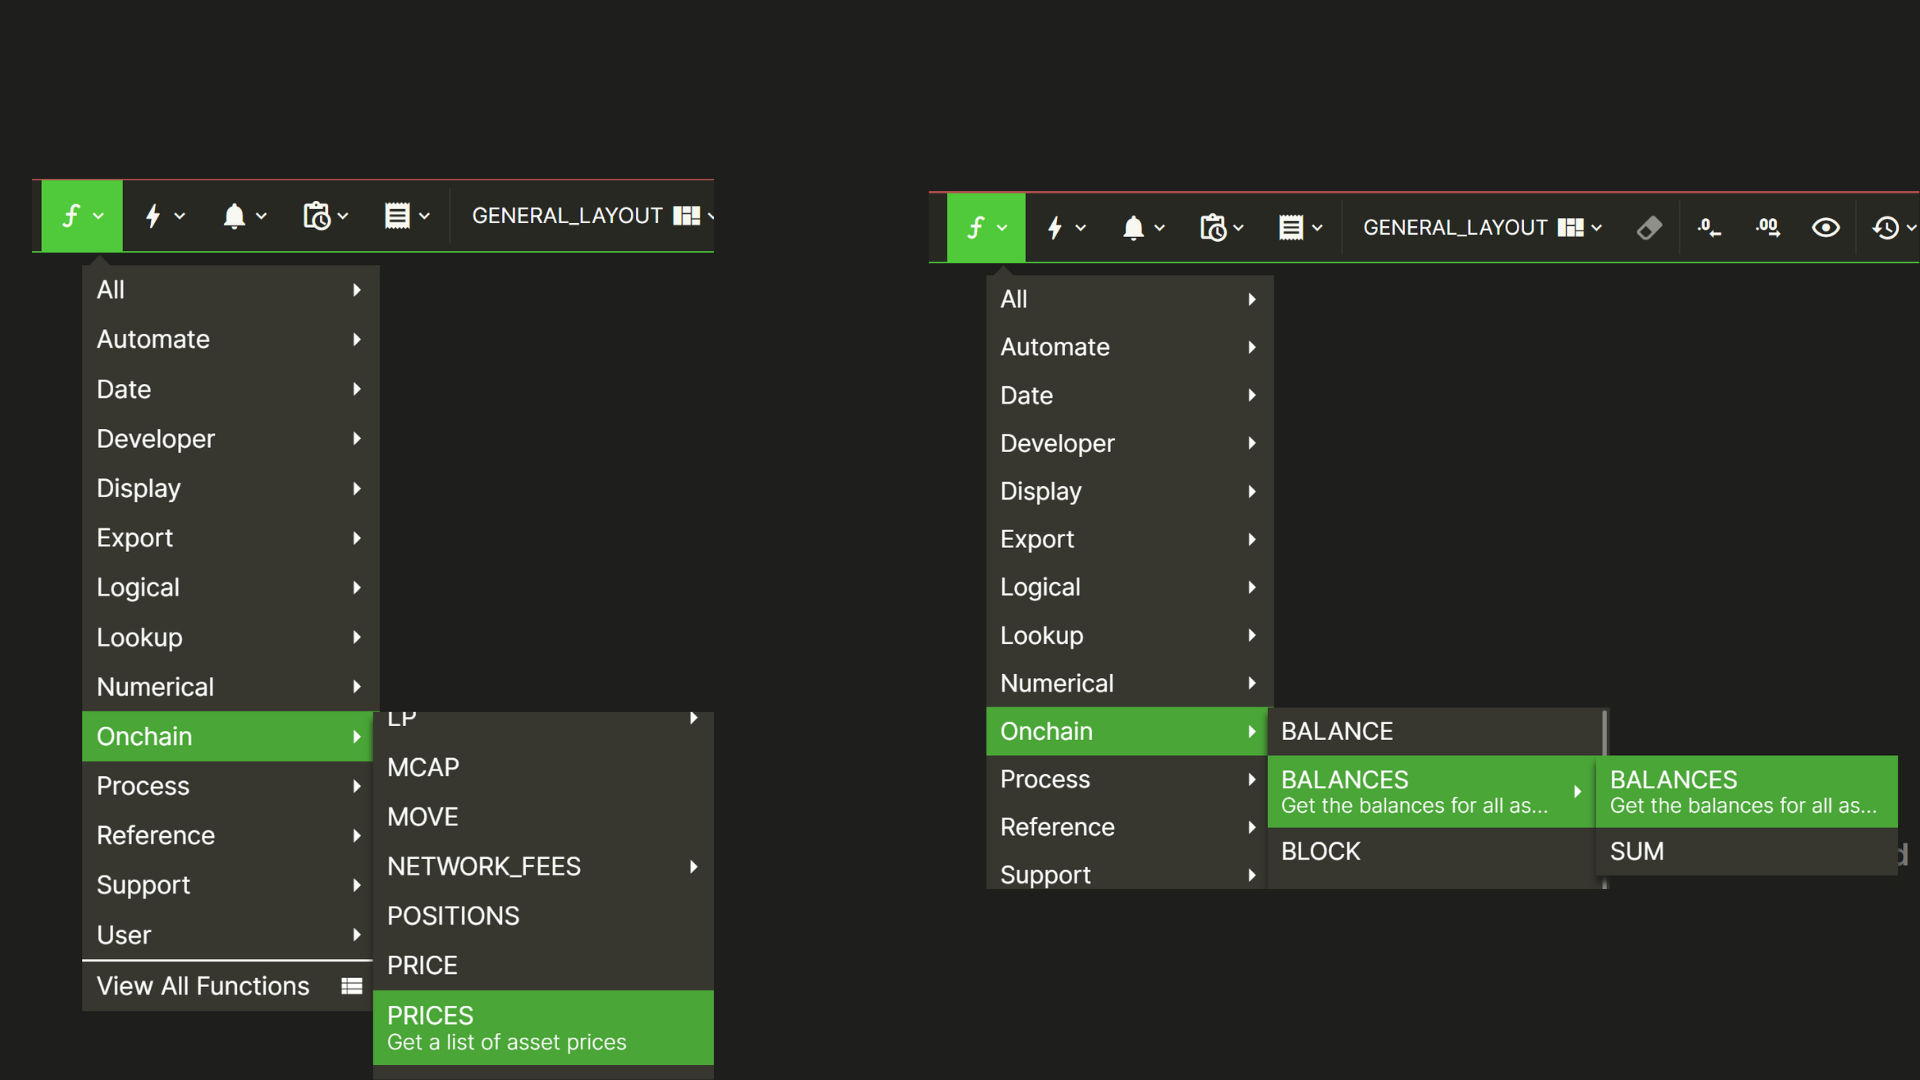
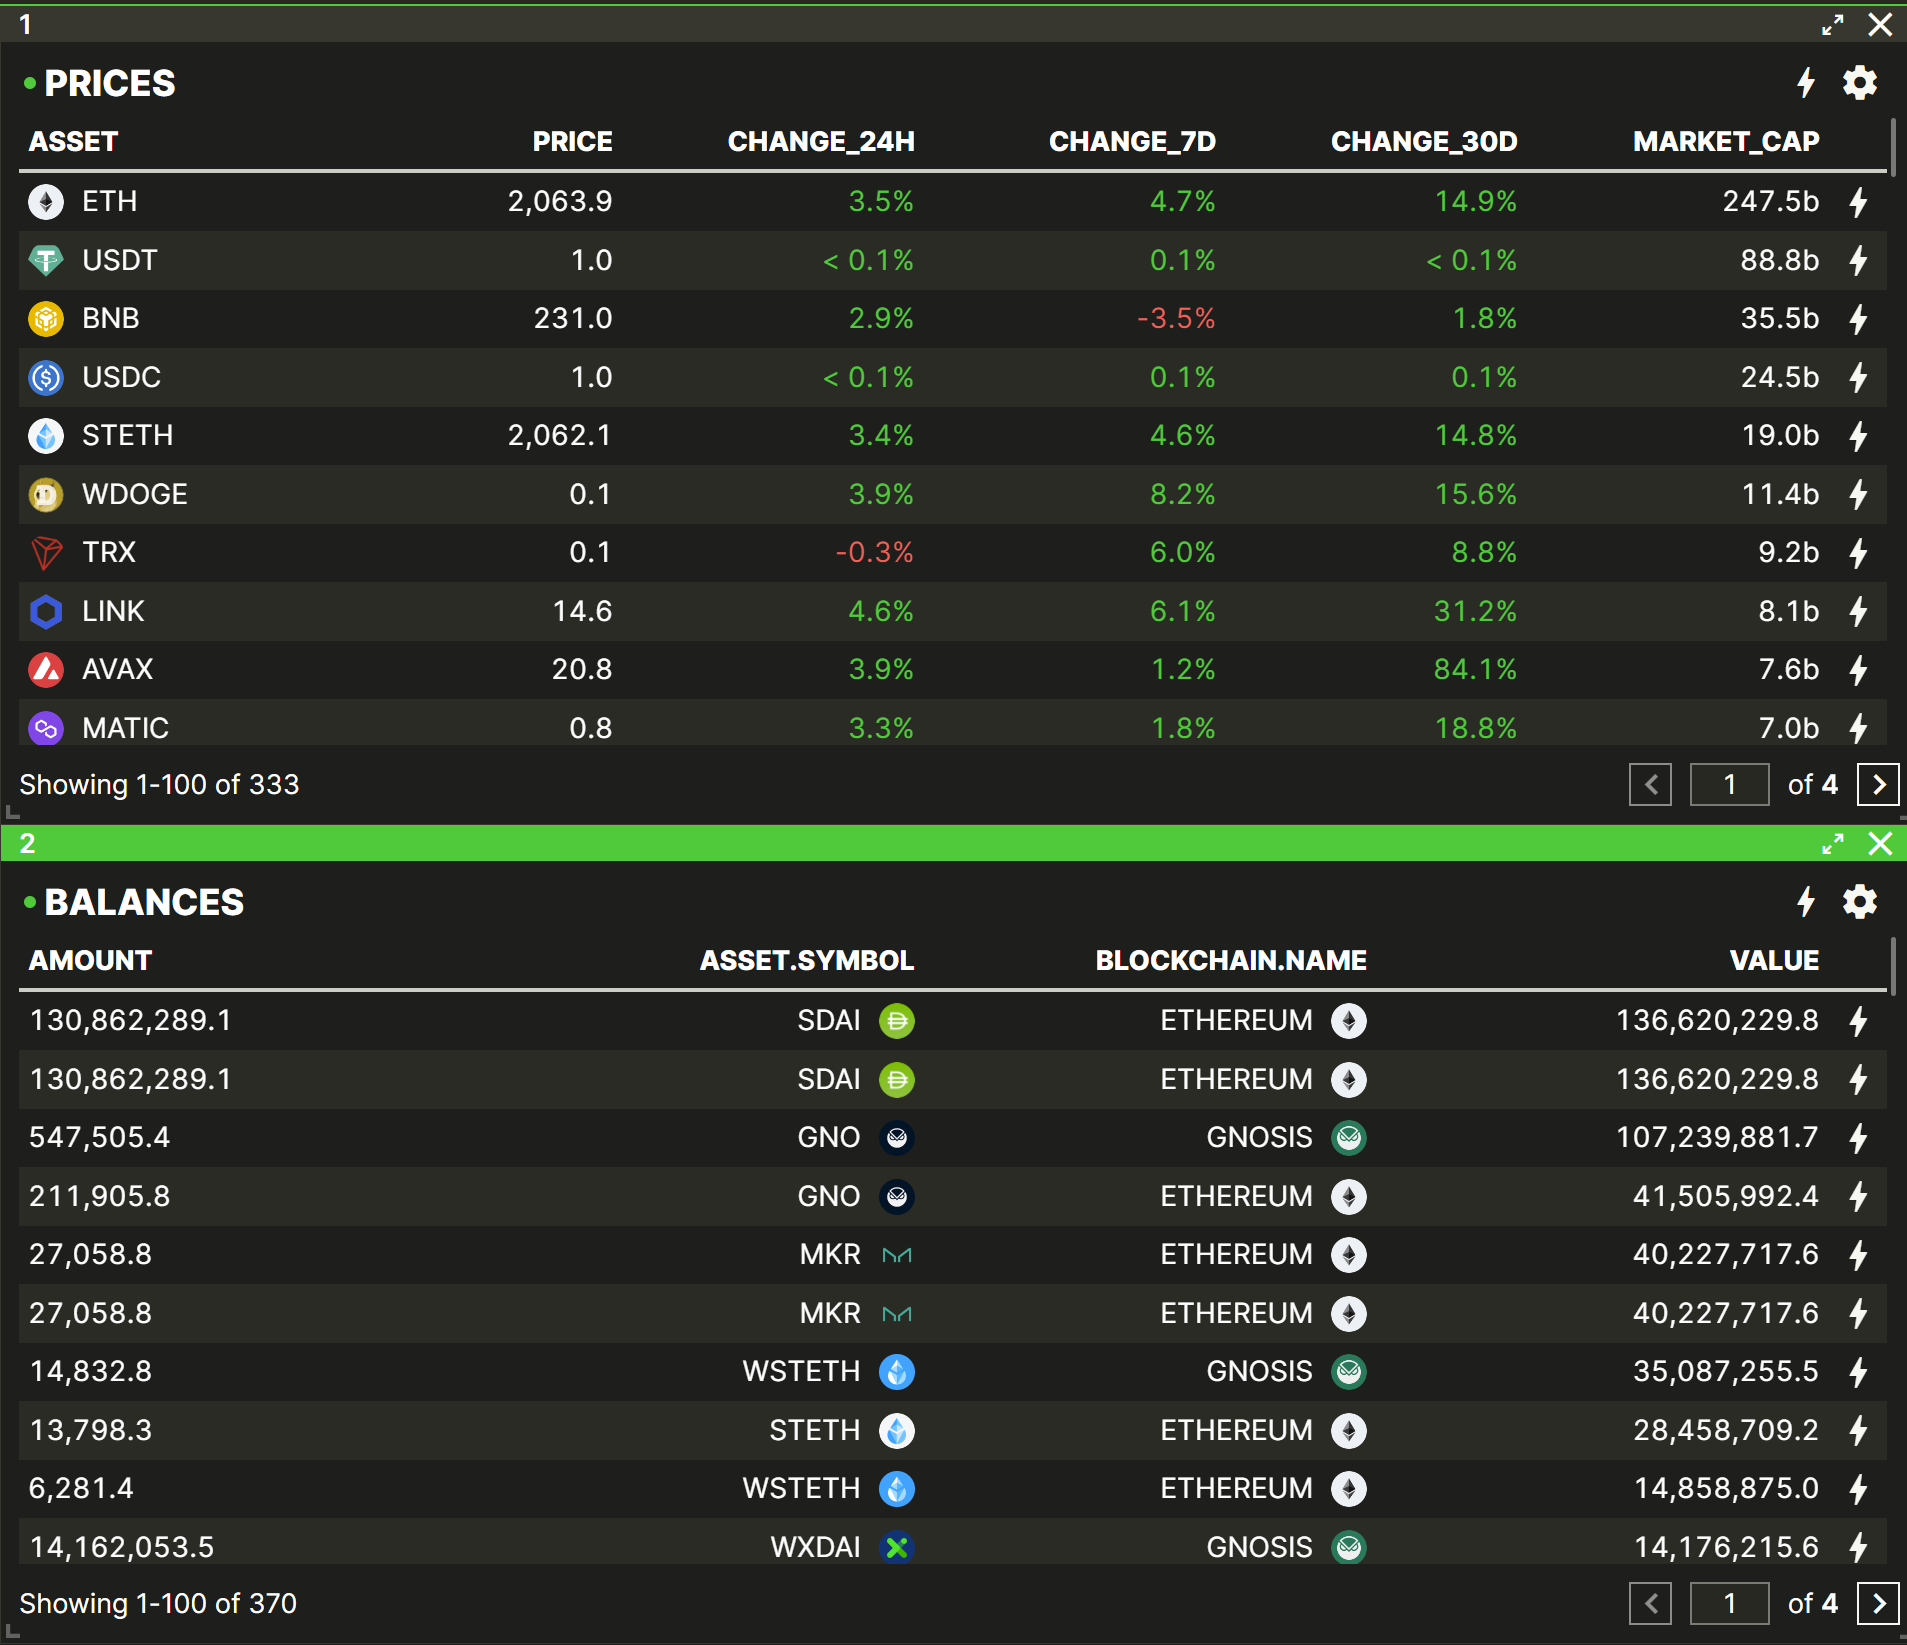
When you click the PRICES and BALANCES functions, the PRICES and BALANCES components will appear.
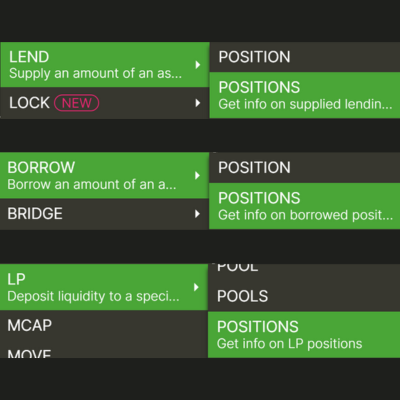
Let's move onto the positions functions. Vektor can search and find all your various positions (Lend positions, borrow positions, etc.) using the various POSITIONS functions.
- In the “Onchain” category, run the positions functions:
- Functions > Onchain > LEND > POSITIONS for lend positions
- Functions > Onchain > BORROW > POSITIONS for borrow positions
- Functions > Onchain > LP > POSITIONS for LP positions
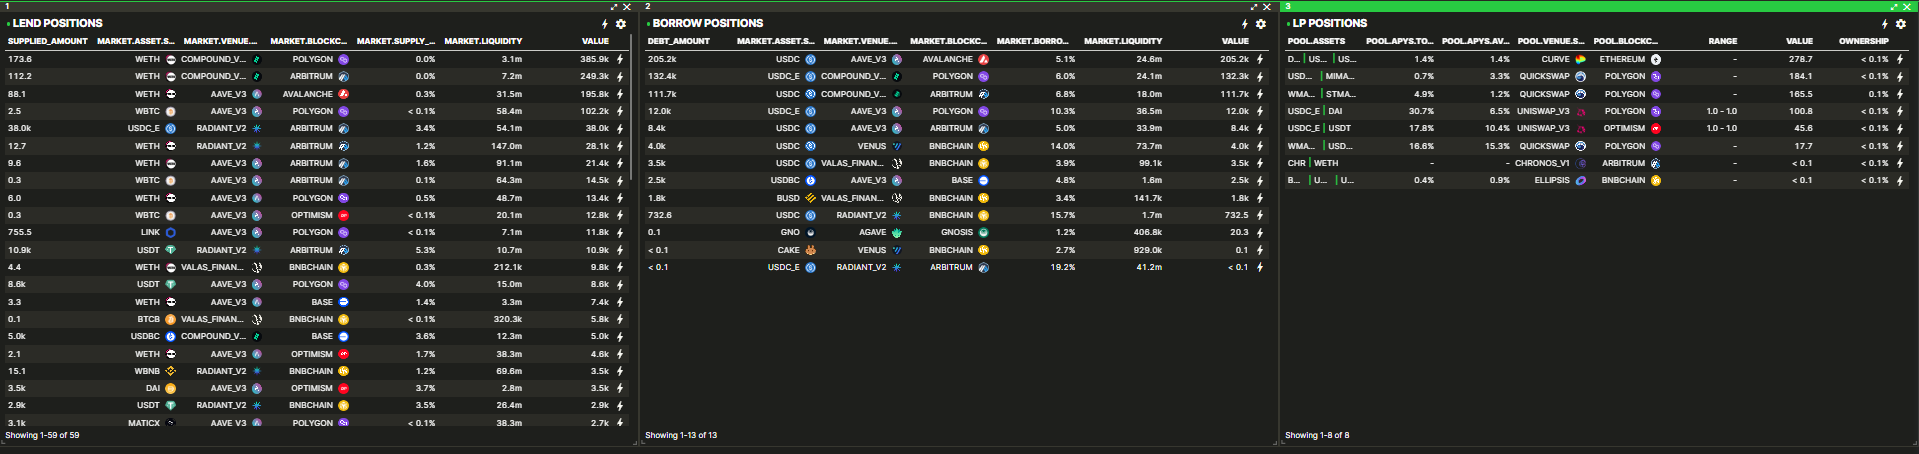
Now you've created a simple Layout with useful components including BALANCES, PRICES, and all your POSITIONS.
Step 4: Access more filtered data using the Quick Actions menu
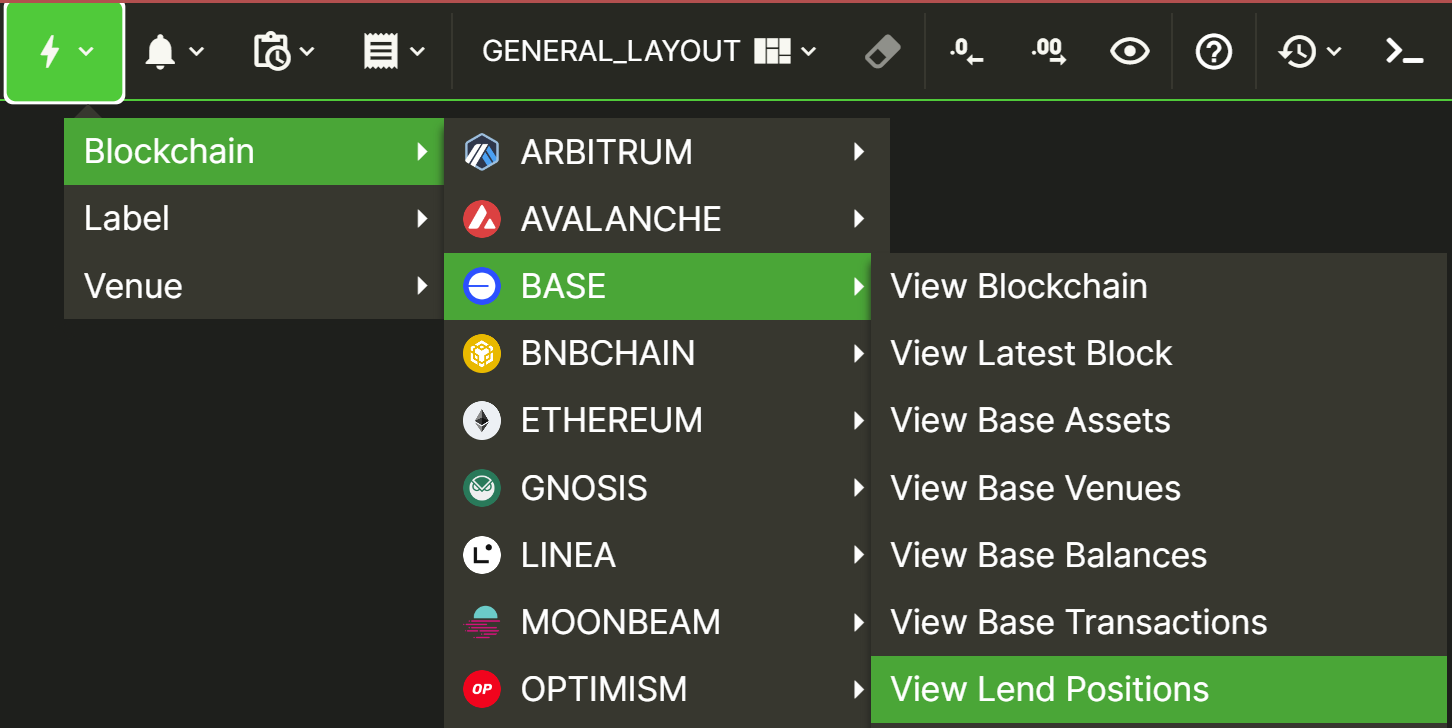
The Quick Actions menu provides a curated list of functions grouped by things like Blockchain, Label (i.e. address) and Venue. You can use the Quick Action menu to more easily study your balances, positions, with these filters applied.
For example, to find your Lend Positions just on the Base blockchain:
- Select the Quick Actions menu ⚡️.
- Go to Blockchain > BASE > View Lend Positions.
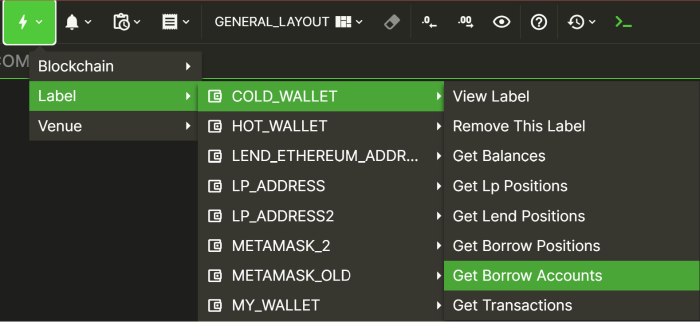
Or, find your Borrow Accounts filtered on a specific labelled address (but across all chains and venues):
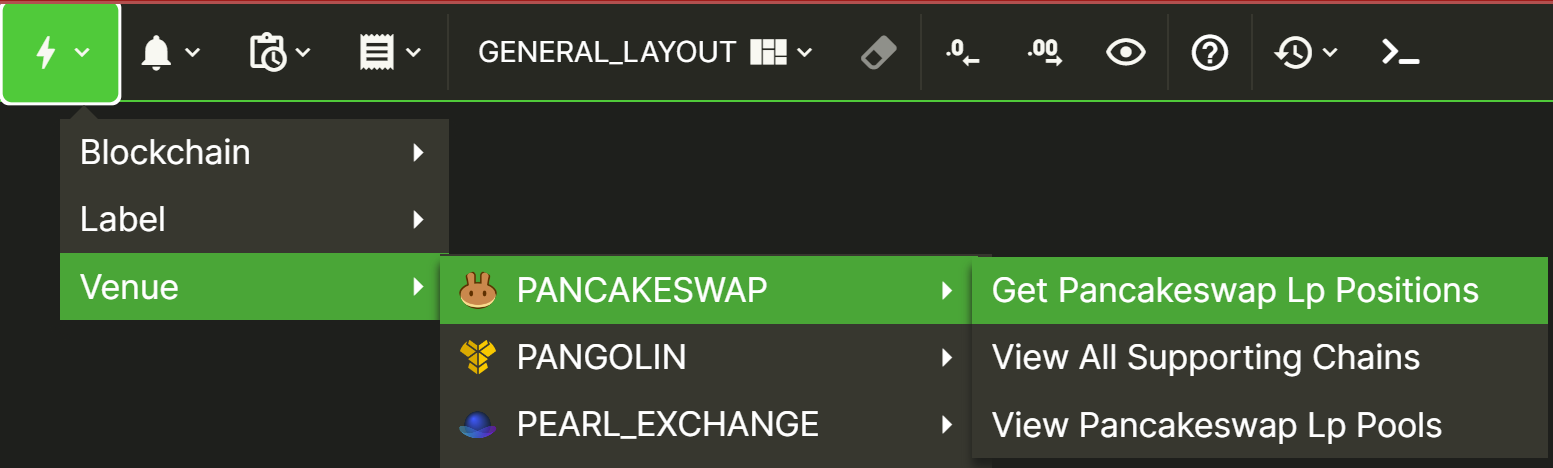
Or, find your LP positions filtered on a specific venue (but across all labels and chains):
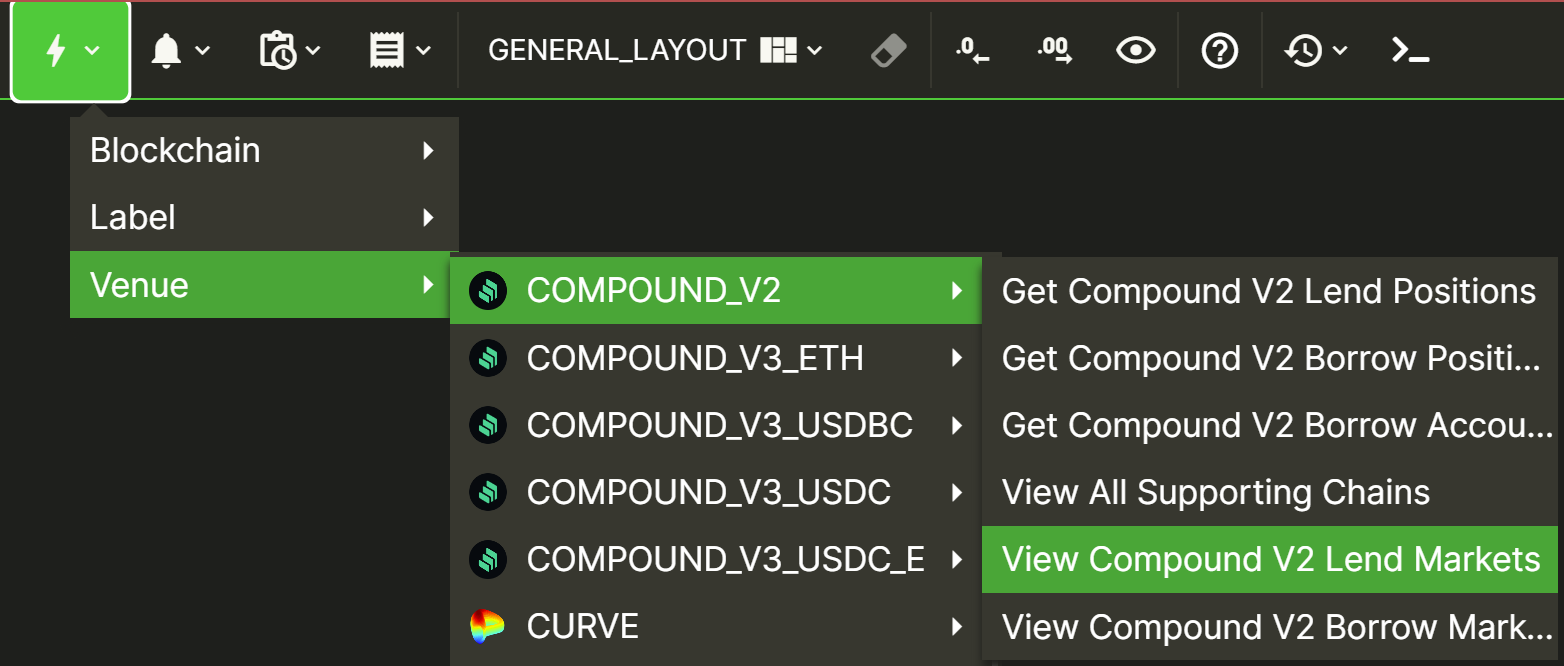
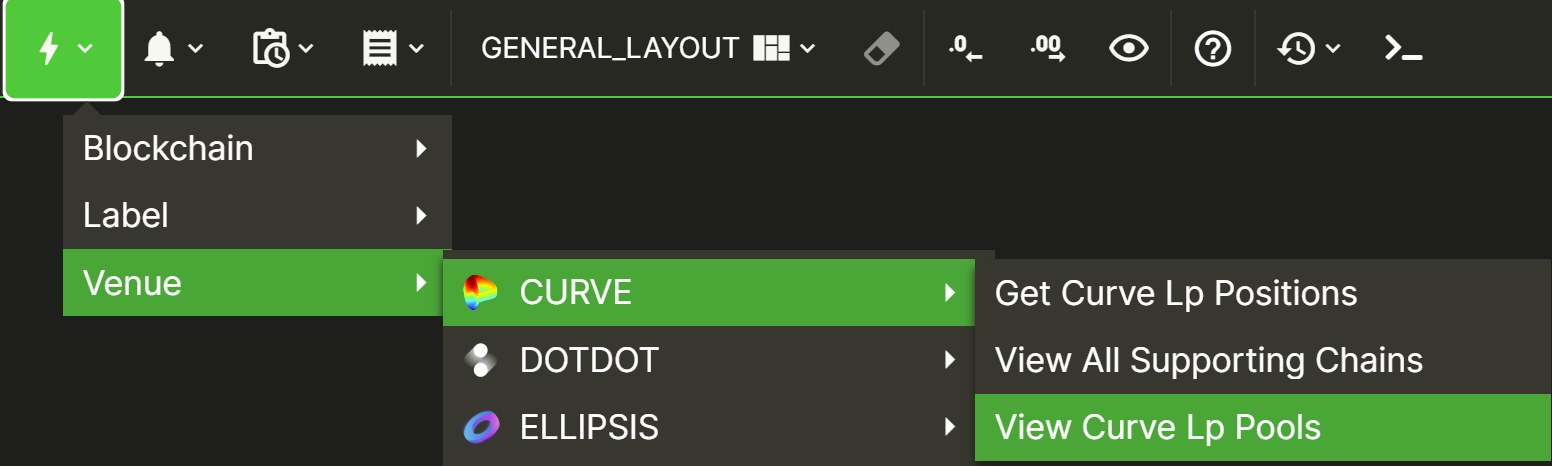
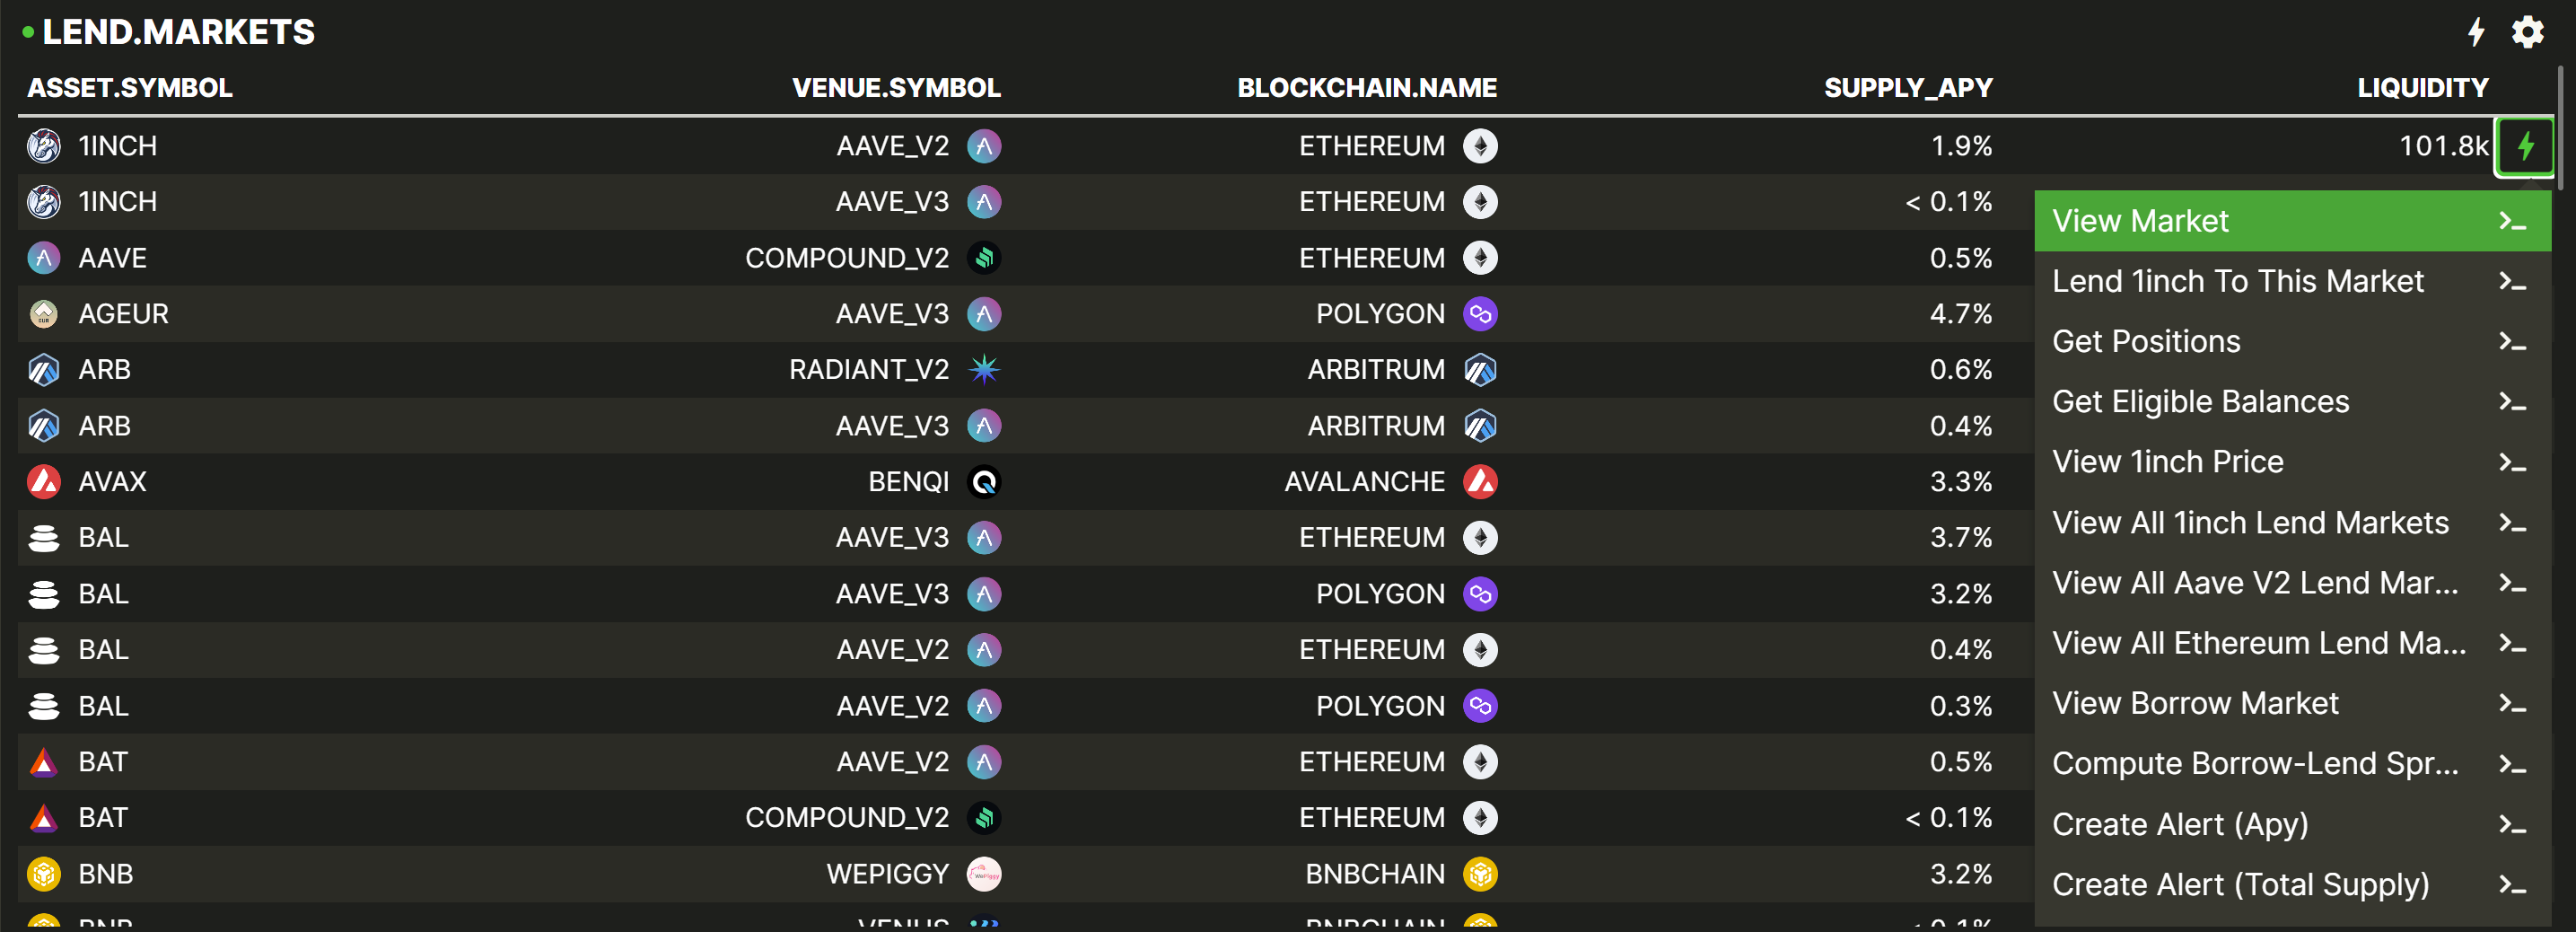
Or, find all the lending markets filtered on a specific venue (but across all assets and chains):
Or, find all the LP pools filtered on a specific venue:
You get the idea.
Step 5: Use Advanced Quick Actions directly from Layout components
Advanced Quick Actions refers to a more extensive, curated, contextual list of Actions that can be accessed directly from a large number of components in your Layout. They are denoted by Lightning icons (⚡️) either
- At the end of each row in a list (for Actions related that that row e.g. Withdraw Position) or
- At the top right of a component (for "List" Actions that apply to the whole list in a component e.g. sort/filter the list).
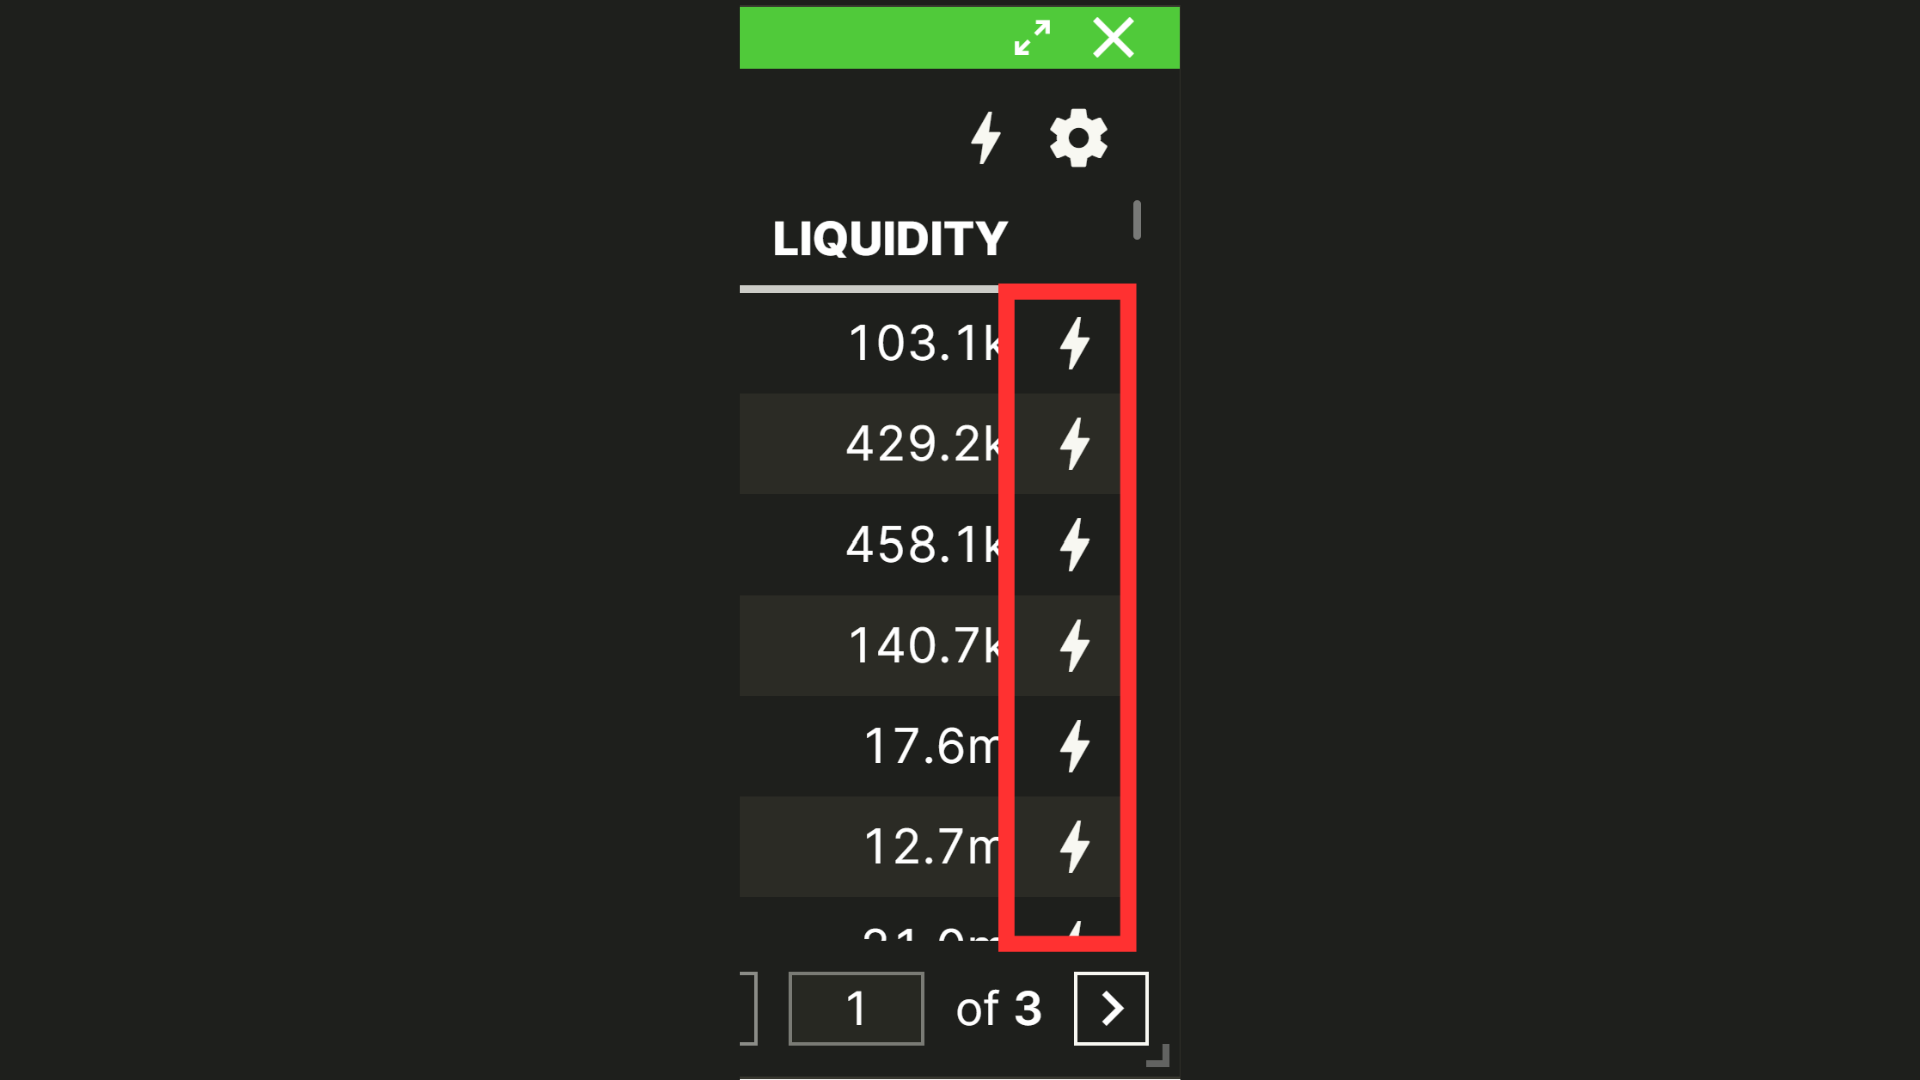
Explore the available Quick Actions by clicking on these Lightning Icons.
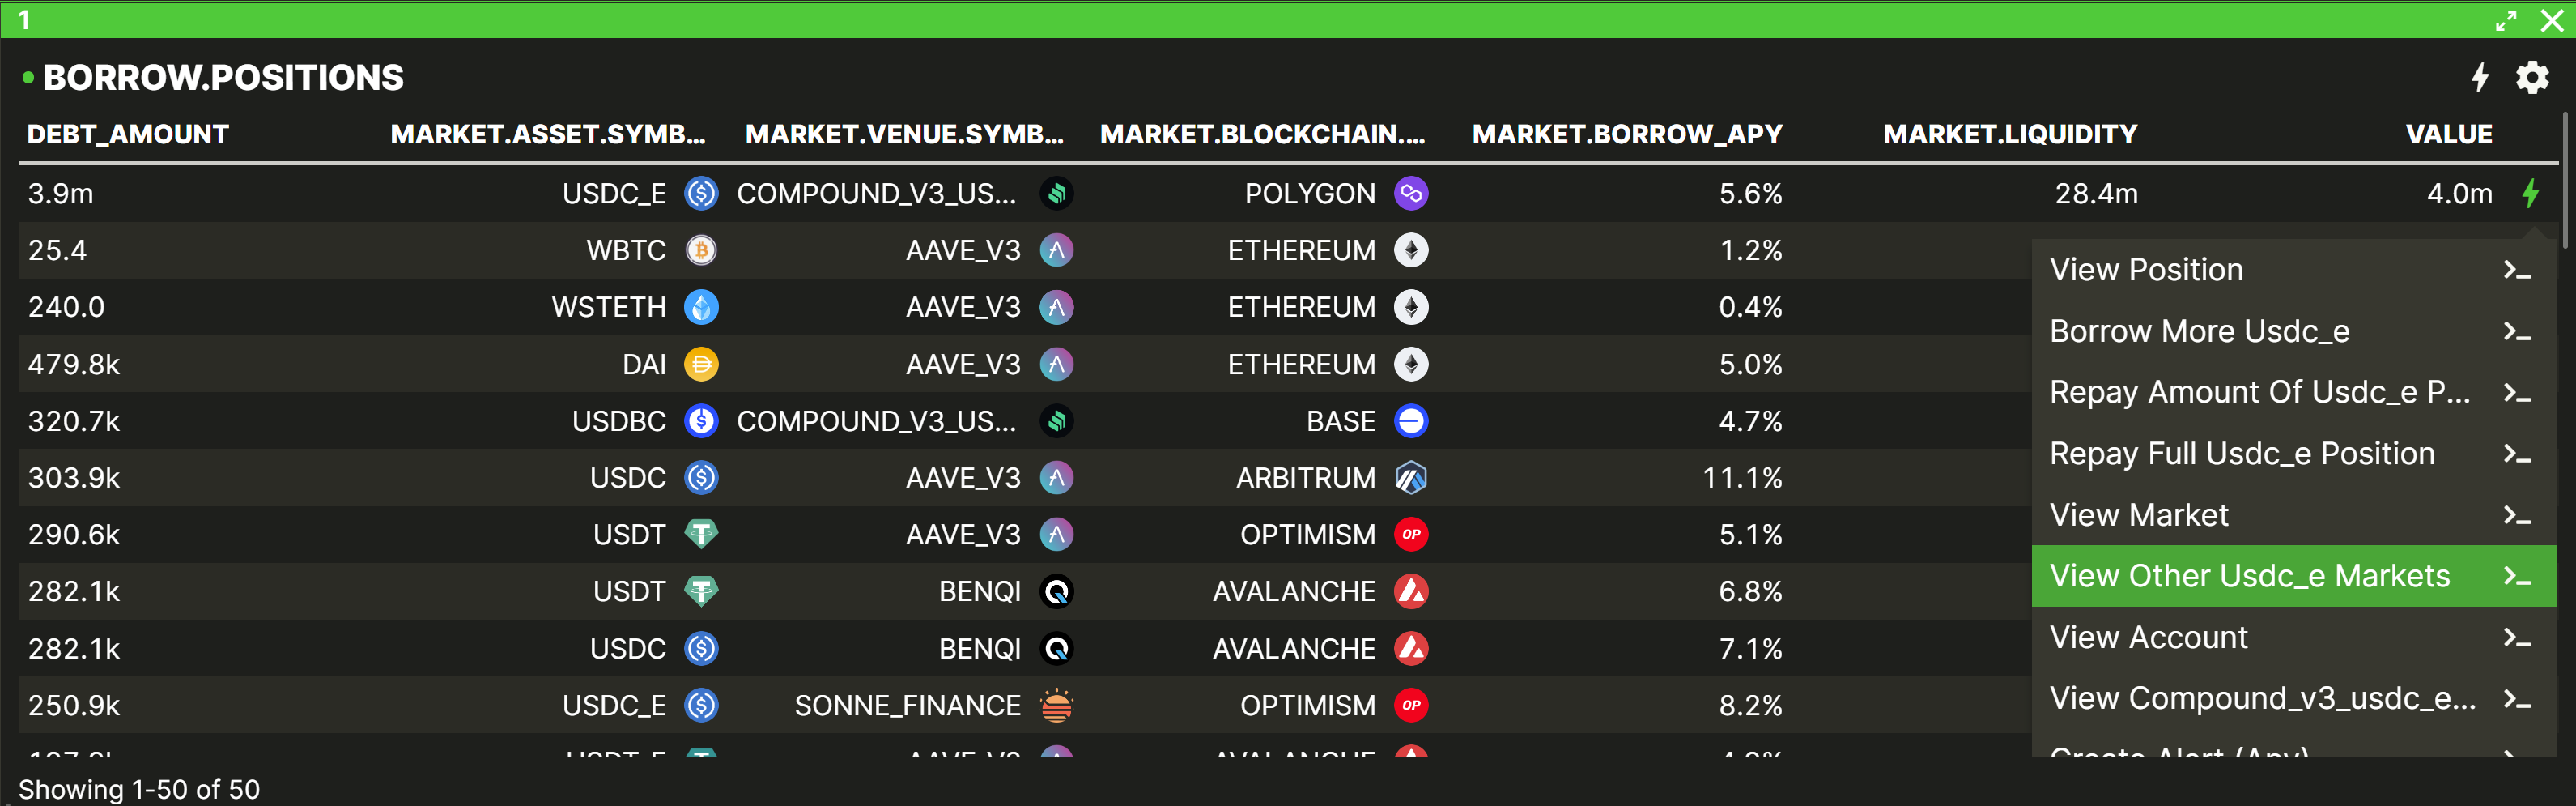
e.g. Look for better opportunities for my existing position
- Find a lend position:

- Click the Quick Actions and select “View other [ASSET] markets”
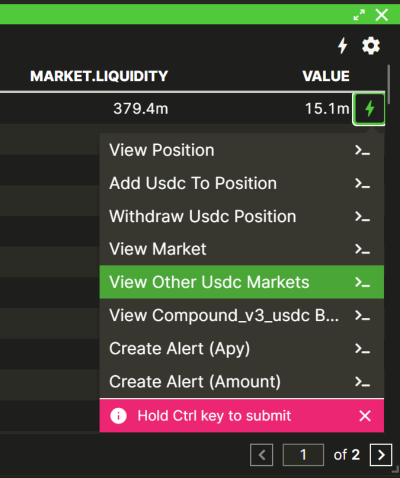
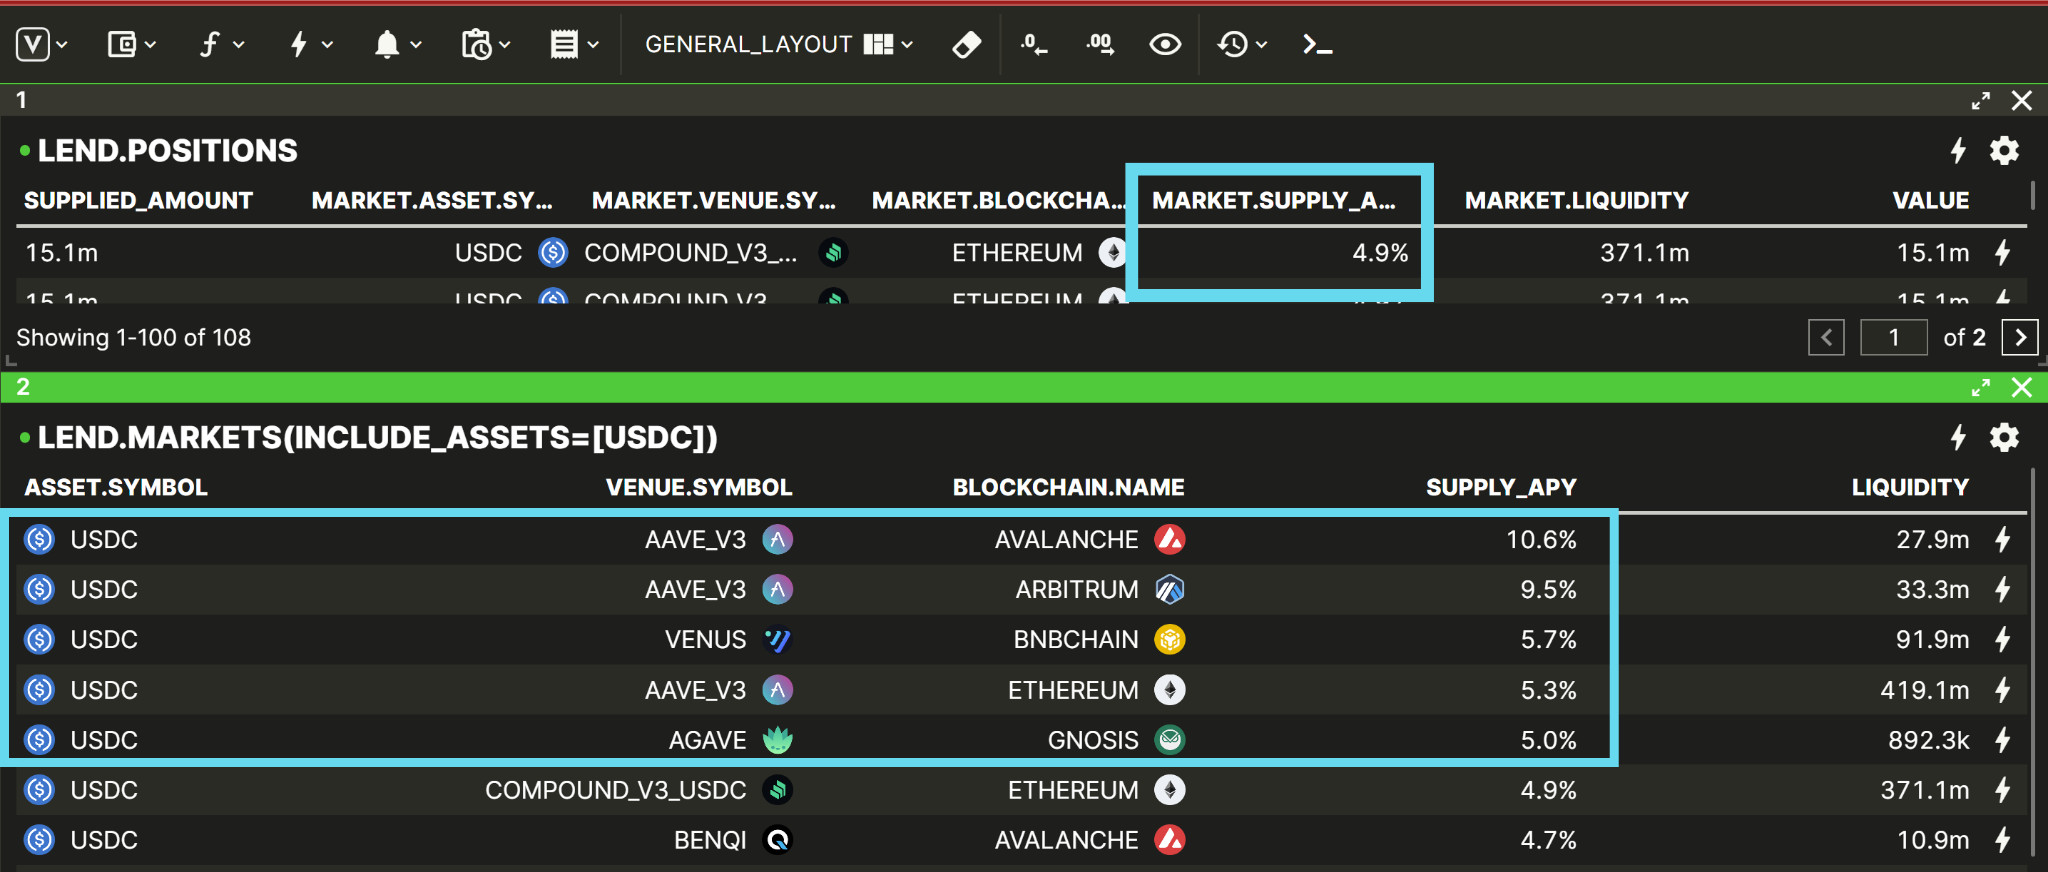
This displays a list of similar lending markets with the same asset of that position, allowing you to compare APYs and see if you're getting the best rate.
Similarly, accessing the ⚡️ menu from the BORROW.POSITIONS component give you Quick Actions related to that borrow position...
... and accessing from the LP.POSITIONS component give you Quick Actions related to that LP position...
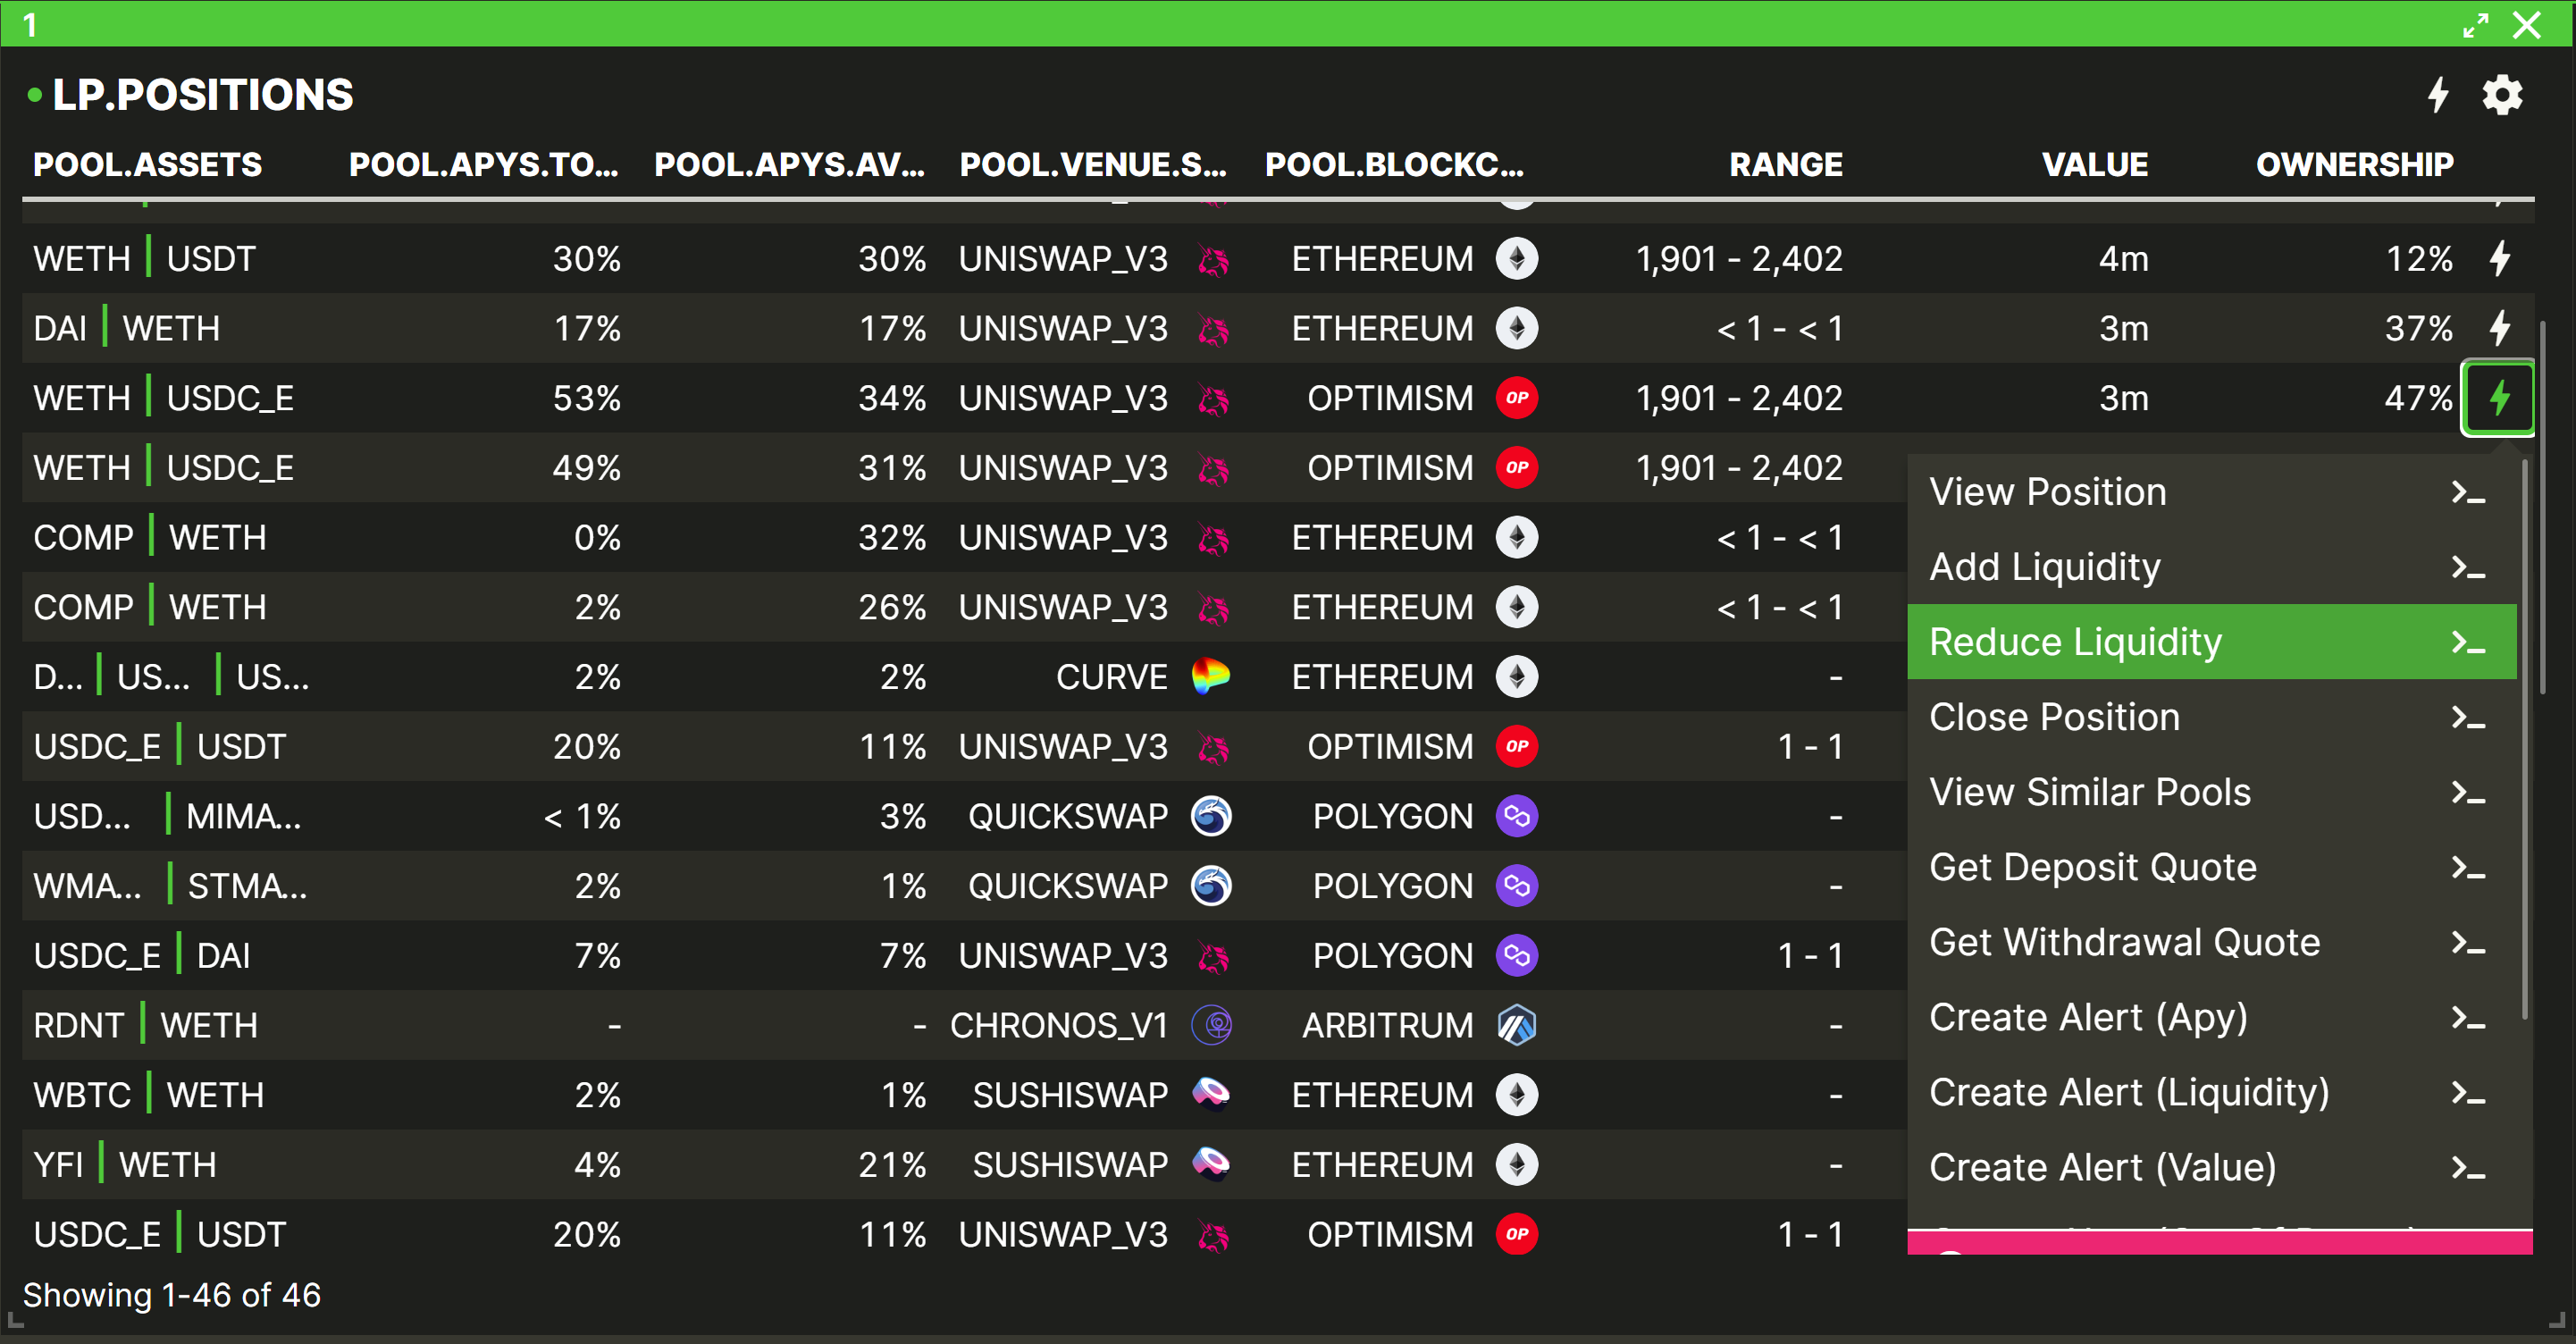
- Take your time and explore all the Quick Actions that each component list offers.
Step 6: Submit your first Commands using the Command Line
You may have noticed that behind the scenes Vektor is running a sophisticated engine to process and handle the various requests. The backbone of the system is a language called VXL, which powers all the functions. Even if you're using the App Toolbar or Quick Actions, you're still running VXL commands.
Users who get the most out of Vektor are those that learn how to use VXL; this unlocks amazing versatility and control. Let's go through some VXL examples.
First, open the command line:
- Go to the app toolbar.
- Click on the last option, "Show Command Line."

- Click again to hide.

You can discover all the available function names using the Functions menu in the App Toolbar and clicking View All Functions. Once you've learned the names of the functions, you can easily run them in the Command Line by just typing them and hitting Enter.
You can also run multiple commands at once by pressing Shift+Enter to type on multiple lines, and then pressing Enter to submit the whole batch. For instance, you could enter the below and recreate many of the functions we covered earlier in one shot.
Step 7: Filter some lists using the built-in function filters
In Step 4 we used the Quick Actions menu to access more filtered data (e.g. all the Lend Positions on a specific Chain, or all the Lend Markets on a specific Venue. But we can also use these filters using VXL in the Command Line. This allows us to go much further and create powerful filters combing chain, asset, venue, labelled address, and more.
The syntax for this is to use the optional arguments e.g INCLUDE_BLOCKCHAINS=[] or EXCLUDE_ASSETS=[] inside the functions. Here are some examples:
- Prices of WBTC, ETH, BNB and LINK:
PRICES(INCLUDE_ASSETS=[WBTC,ETH,BNB,LINK])
- Lend positions in Ethereum:
LEND.POSITIONS(INCLUDE_BLOCKCHAINS=[ETHEREUM])
- Borrow positions in AAVE_V2 and AAVE_V3:
BORROW.POSITIONS(INCLUDE_VENUES=[AAVE_V2,AAVE_V3])
- LP positions of a specific labelled address:
LP.POSITIONS(INCLUDE_LABELS=[ADDRESS_0])
- Lend markets excluding the ones in Ethereum and Arbitrum blockchain:
LEND.MARKETS(EXCLUDE_BLOCKCHAINS=[ETHEREUM,ARBITRUM])
- USDT Borrow markets in Radiant V2:
BORROW.MARKETS(INCLUDE_ASSETS=[USDT],INCLUDE_VENUES=[RADIANT_V2])
- Uniswap LP pools in Ethereum excluding DAI:
LP.POOLS(INCLUDE_VENUES=[UNISWAP_V2,UNISWAP_V3], INCLUDE_BLOCKCHAINS=[ETHEREUM],EXCLUDE_ASSETS=[DAI])
Step 8: Execute some transactions
Vektor's powerful system also lets you execute transactions in a 100% non-custodial way (i.e. we never see your private keys). Here's some example flows:
Example 1: Sell some ETH for USDC
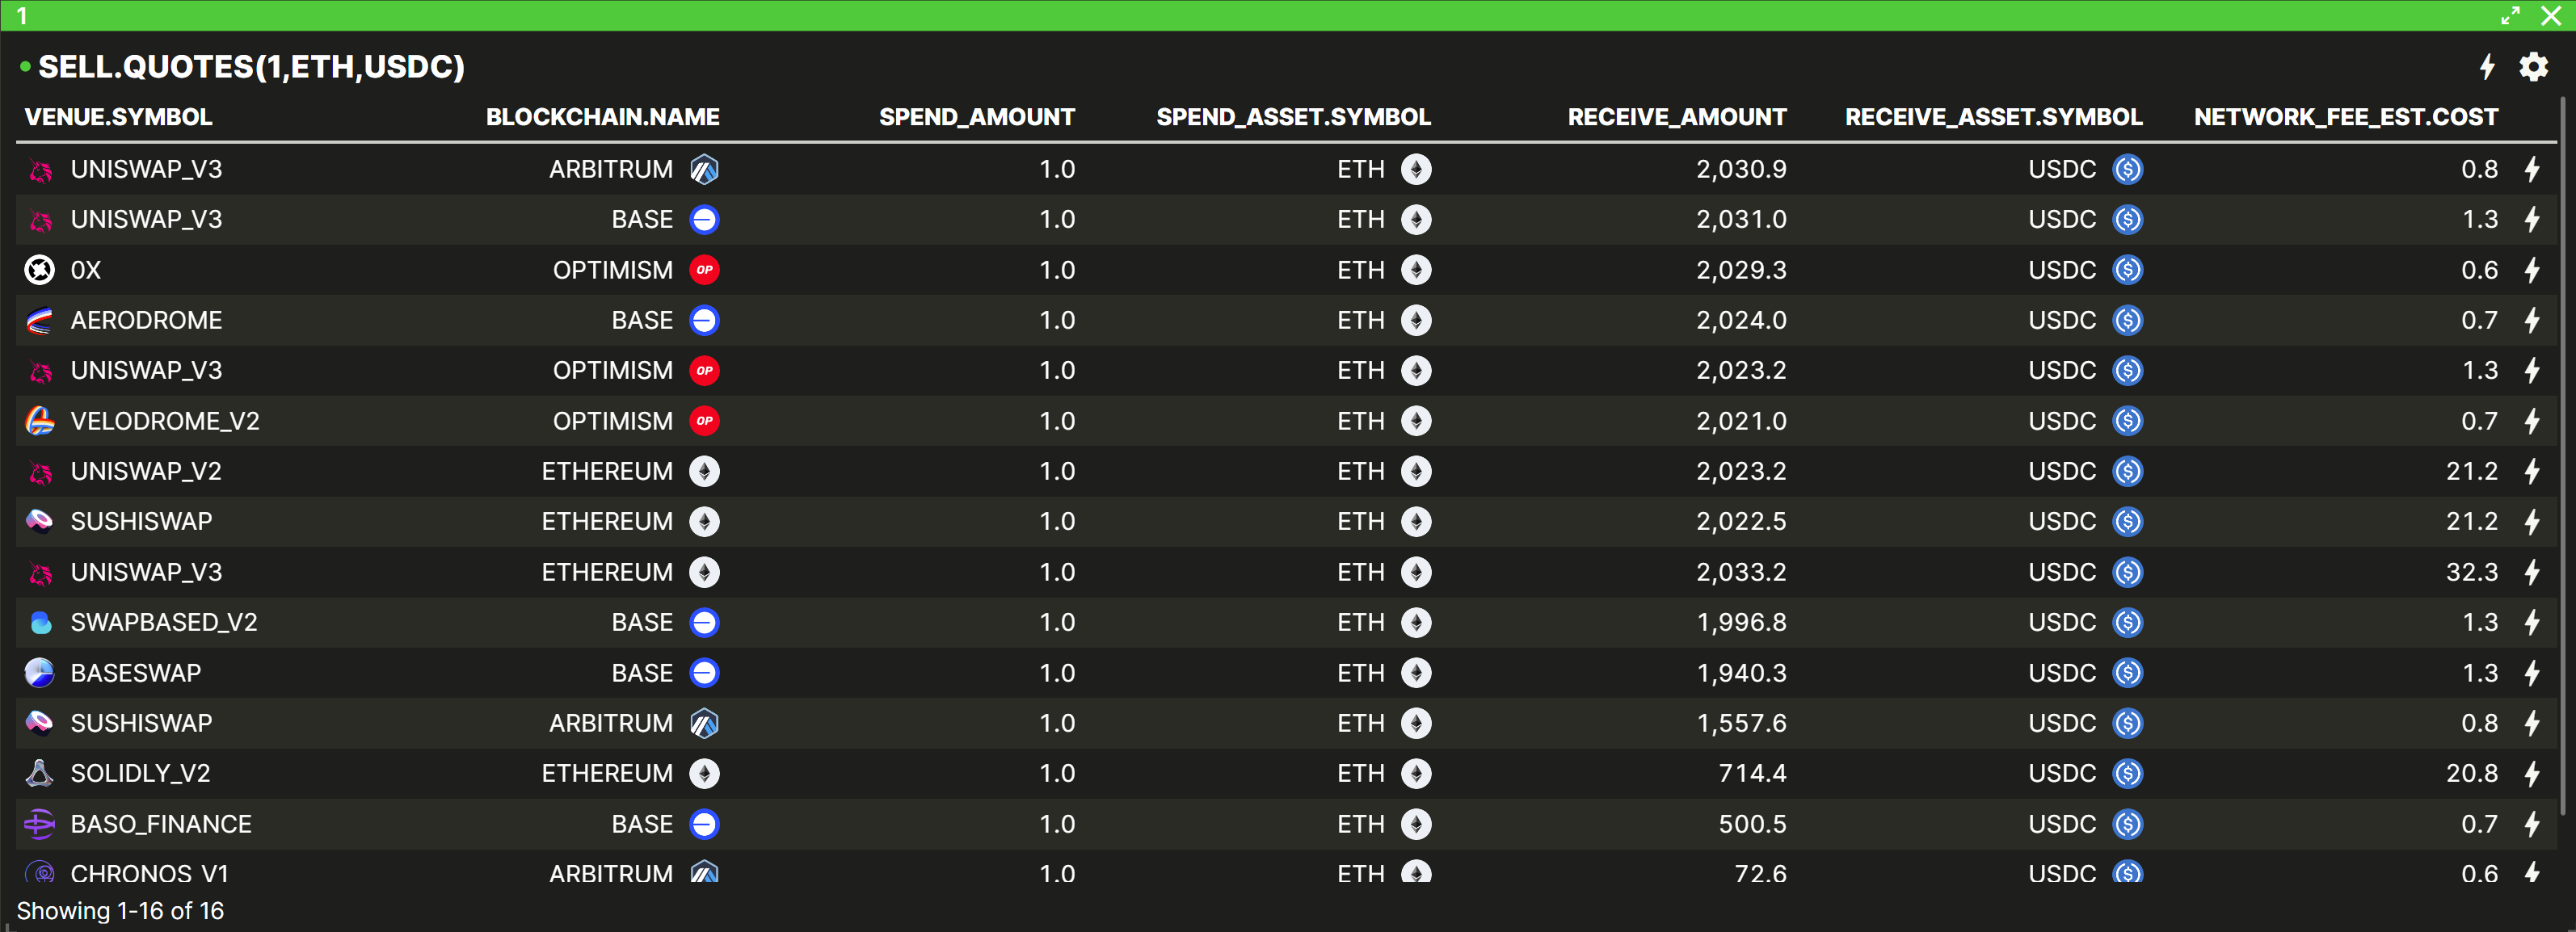
The QUOTES subfunctions let us obtain a list of venue quotes for functions like SELL or BRIDGE, for example:
- How much USDT am I going to receive if I sell 1 ETH:
SELL.QUOTES(1,ETH,USDC)
- How much USDC will I receive if I bridge from Ethereum to Polygon:
BRIDGE.QUOTES(1, ETH, ETHEREUM, ARBITRUM)

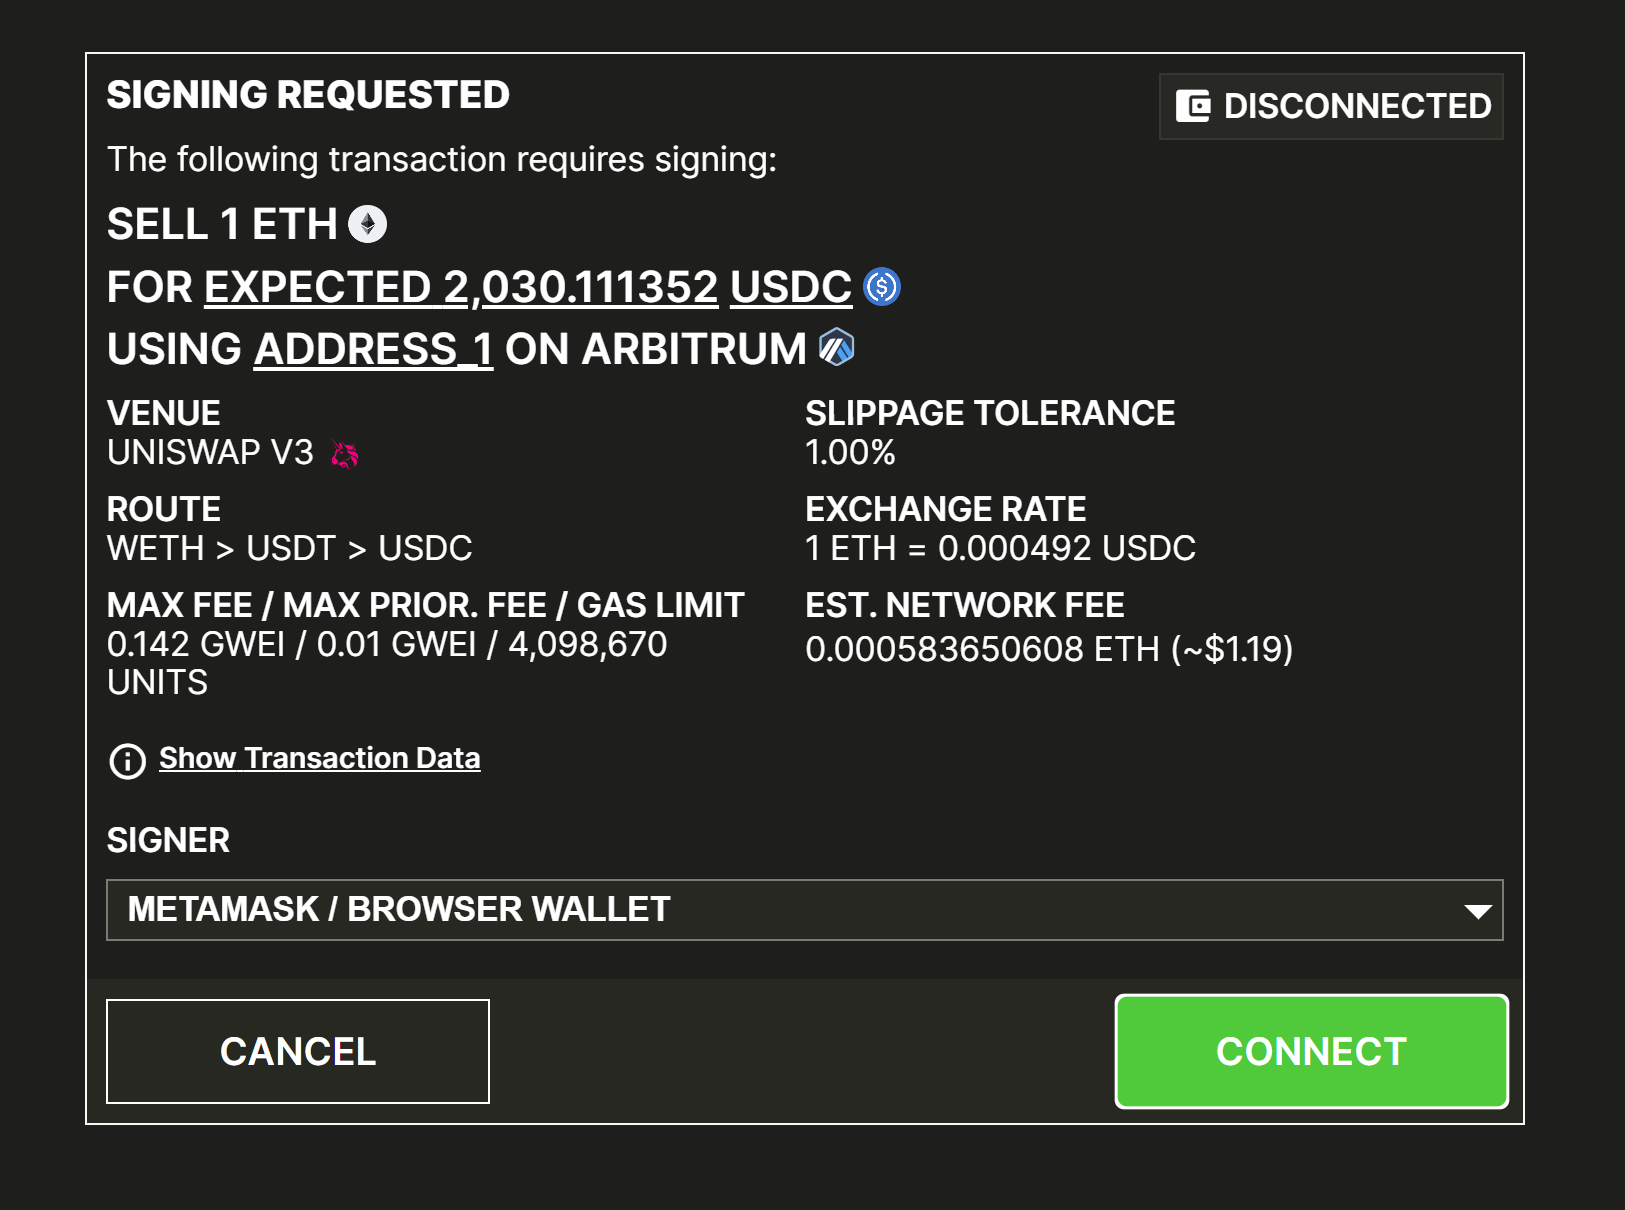
Let's say now that we want to use the Uniswap V3 quote.
- Go to their quick actions and click on "Execute This Quote".

When you click on a Quick Action, you can either attempt to execute this command straight away (i.e. Submit mode or you can first see the VXL code in the Command Line, giving you a chance to review before you submit Review Mode. You can read more about this in our Quick Actions post).
In some cases you must use Review Mode because Vektor requires more information to complete the transaction (e.g. which address do you want to use). In these cases you will see highlighted placeholders that you can overwrite first.
- After clicking "Execute This Quote" enter the label (address) where you want to execute the transaction, and hit
Enter

- Connect your wallet and sign the transaction.
- Use the
TRANSACTIONSfunction to see the state of your transaction.
Example 2: Lend, Borrow, LP Deposit
With Vektor we can also lend, borrow, deposit liquidity, and withdraw liquidity.
Let's see some examples of how we can do it easily with Quick Actions:
- In a
LEND.MARKETSlist, find a market you want to lend to, and in its Quick Actions, select "Lend [Asset] to this market".
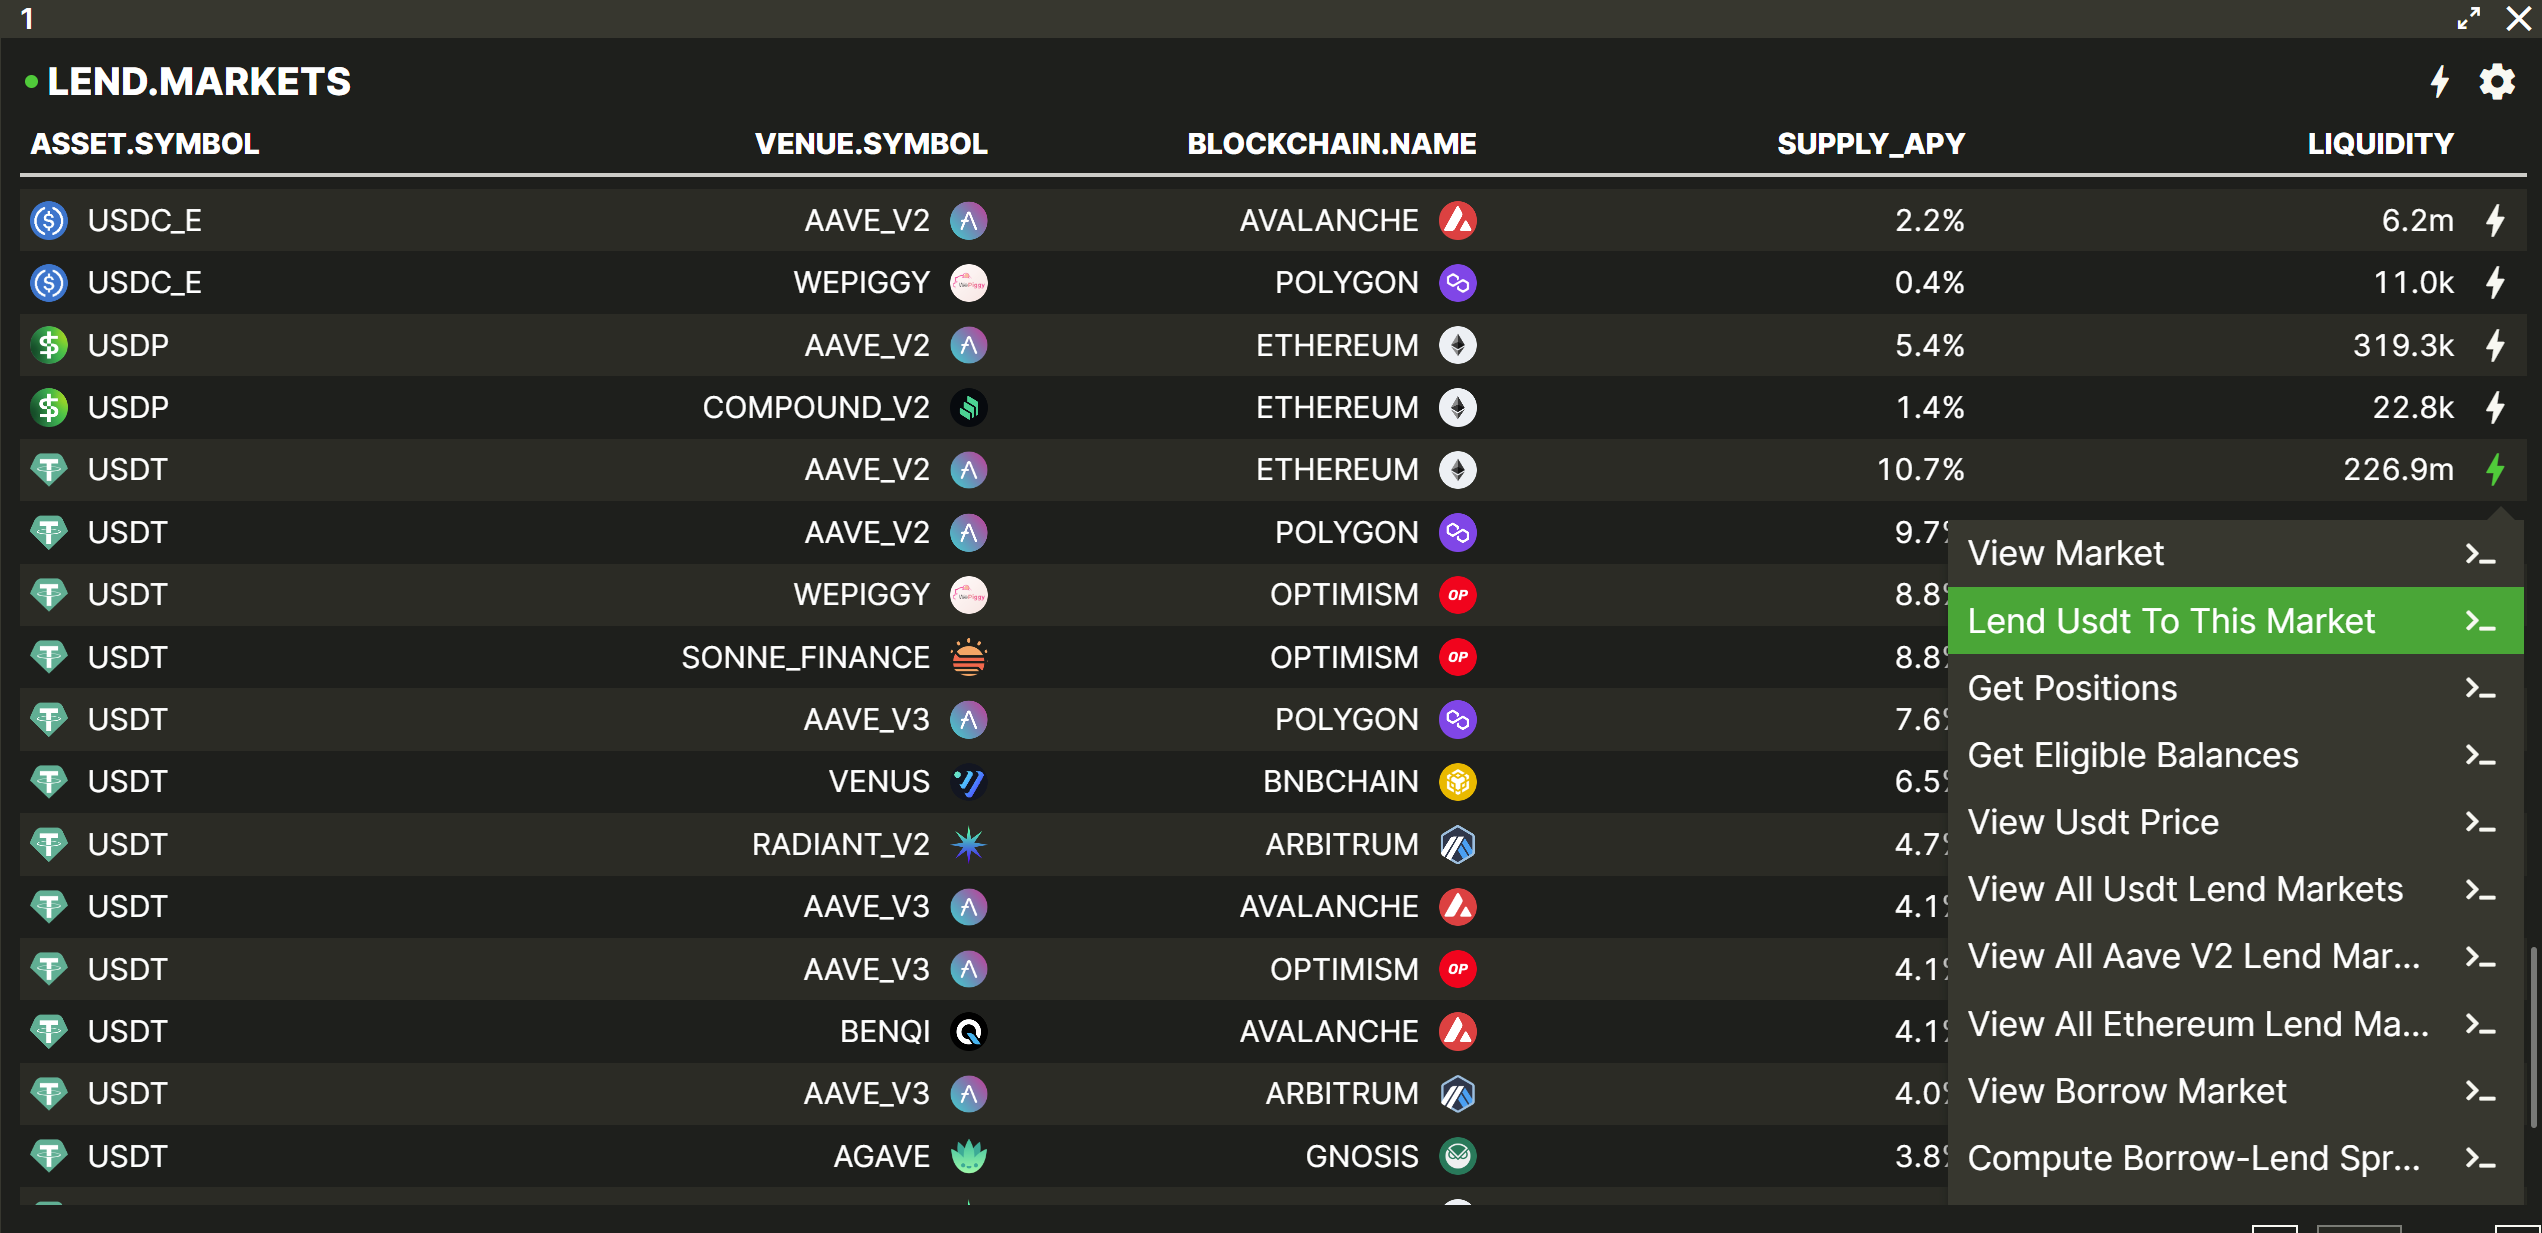
- Choose the amount that you want to lend and, like in Example 1, select the label (address) that you want use. Then repeat the same process that we did before.

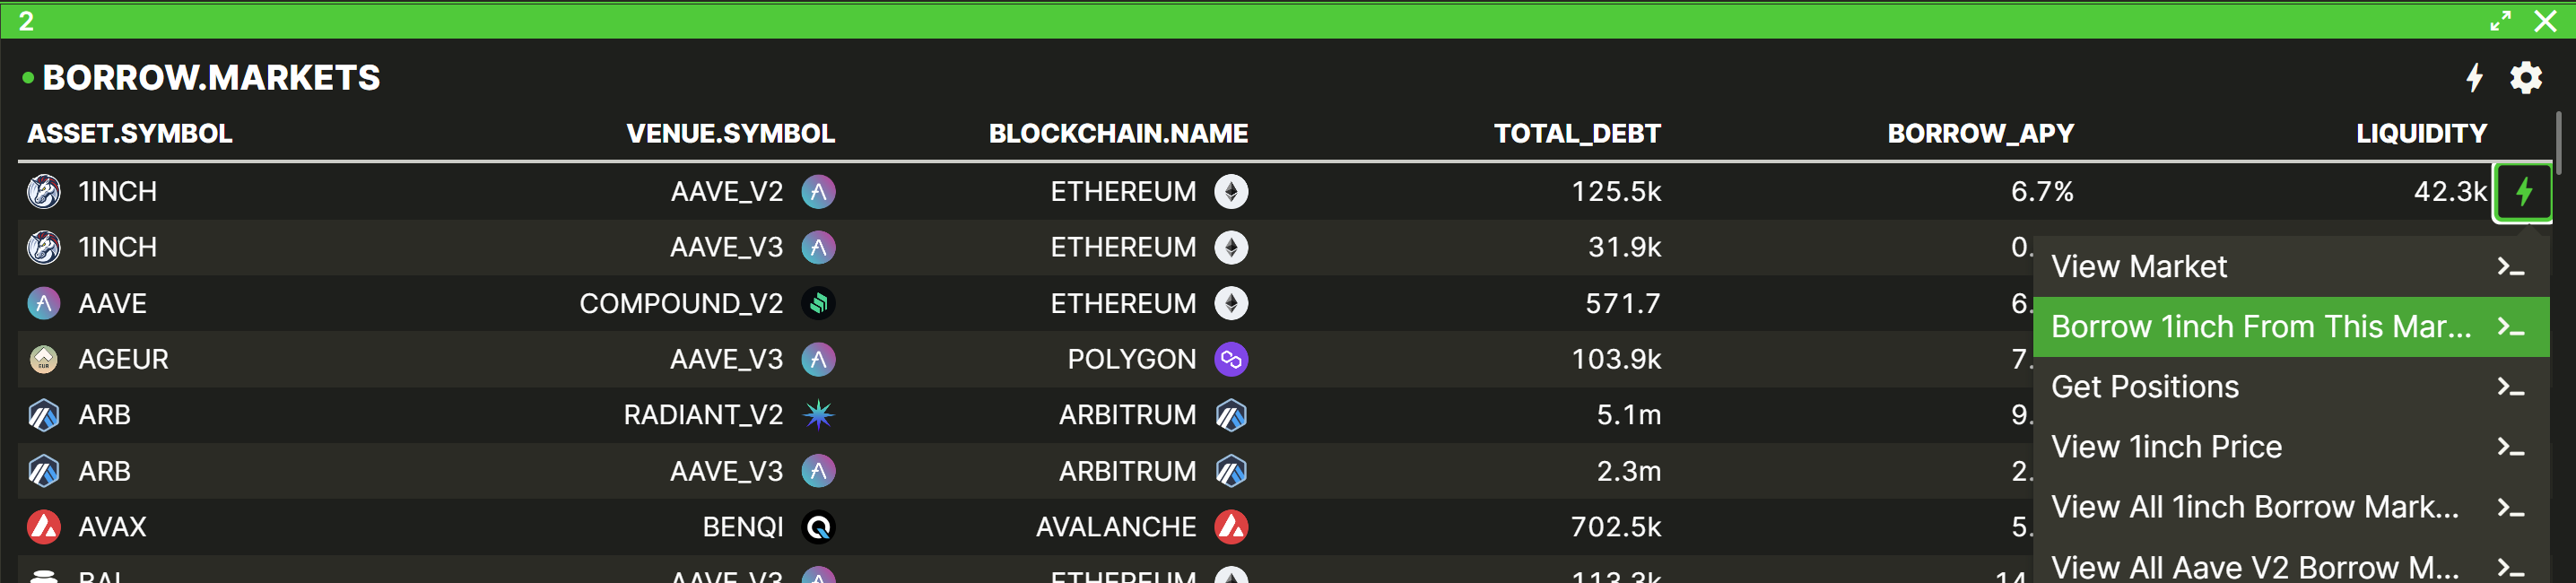
You can follow the same process for Borrow:

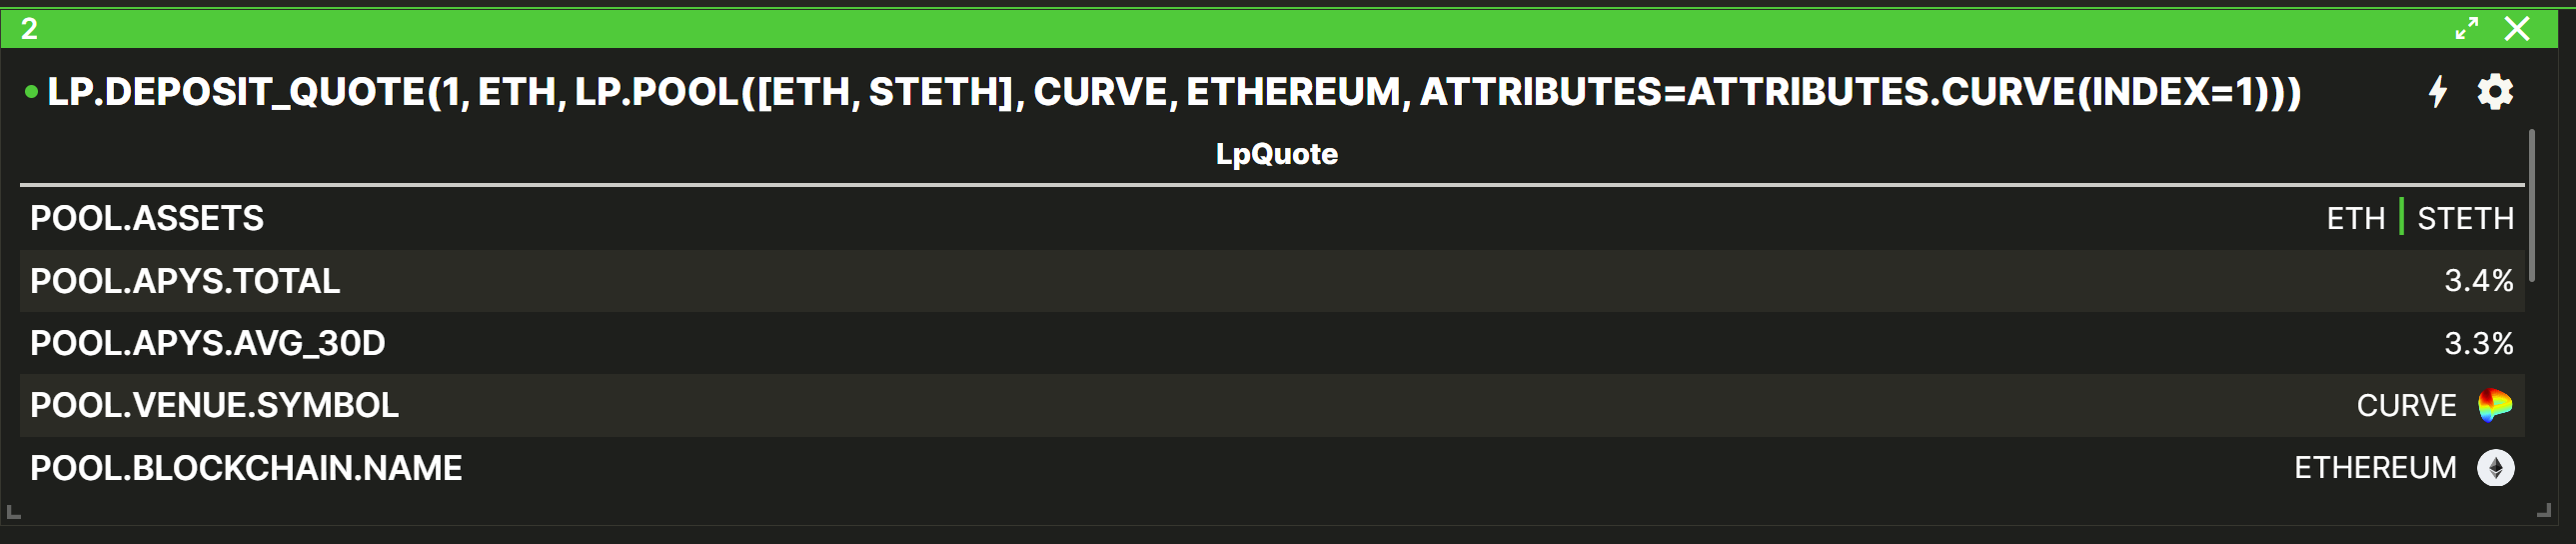
For Liquidity pools, we can also get the deposit quote of the pool:

- We have to select the amount, the asset, and execute the command:
Finally, if we want to deposit liquidity, we can choose the pools, select "Deposit Liquidity," and enter the amount and asset that we want to deposit:


Example 3: Withdraw, Repay, Reduce Liquidity
We can likewise reverse all the execution operations we did in Example 2:
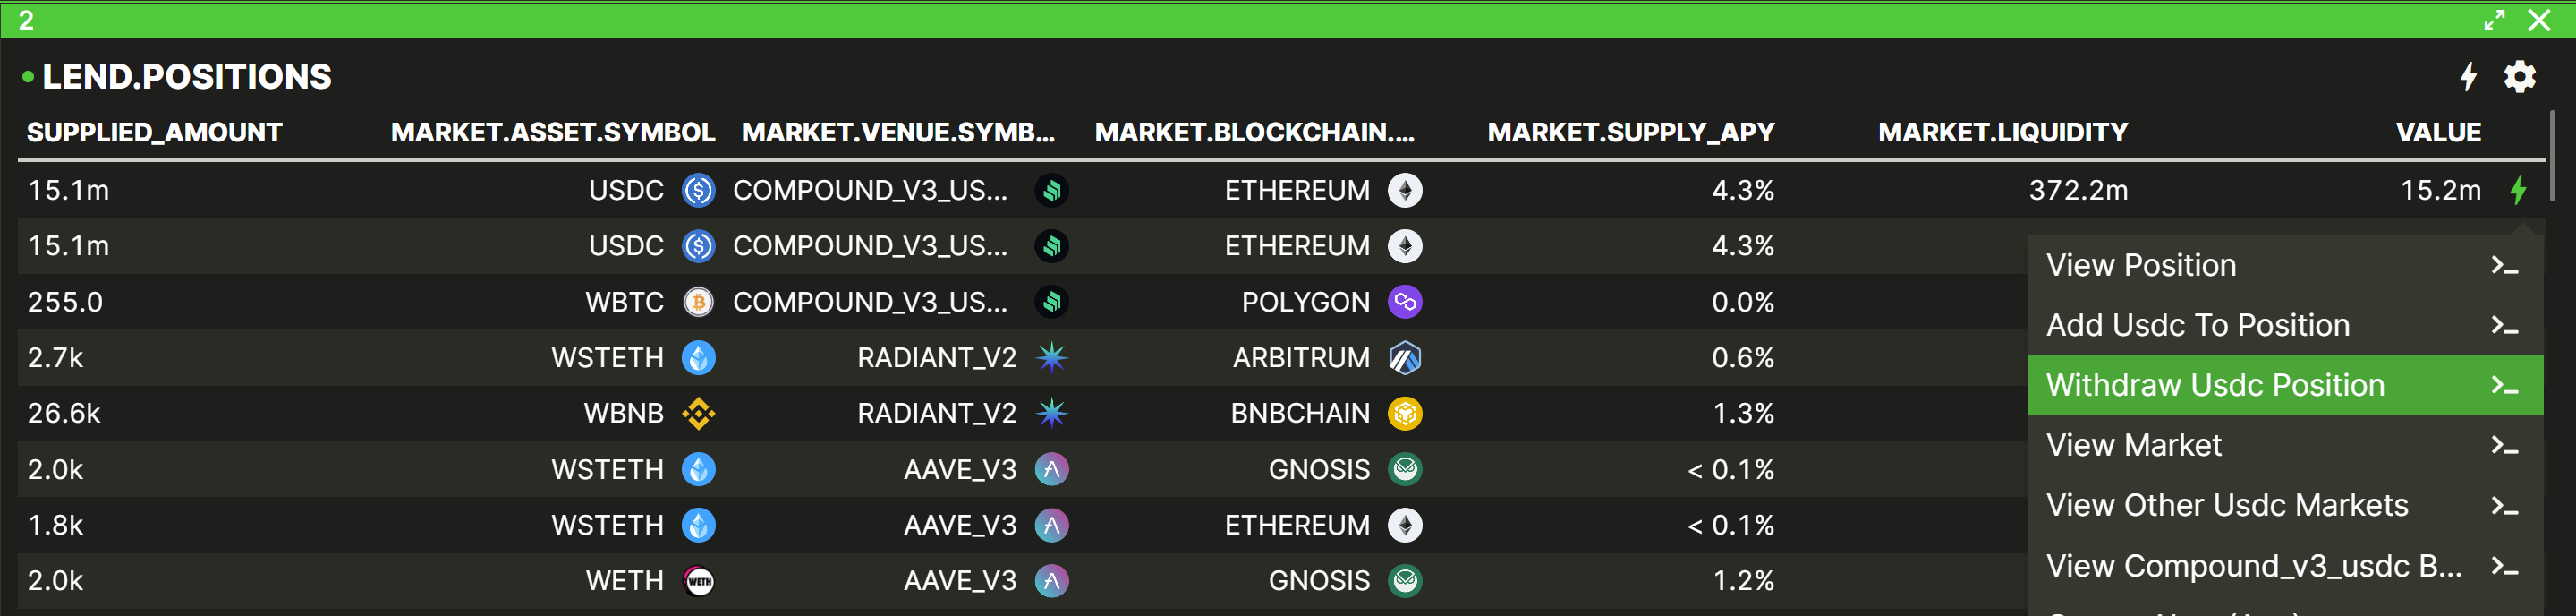
You can withdraw all the supplied lend position amount by selecting "Withdraw [Asset] Position" in its Quick Actions:
If you want to withdraw a partial amount of the supplied lend position , you can use the LEND.WITHDRAW function and select how much you want to withdraw:

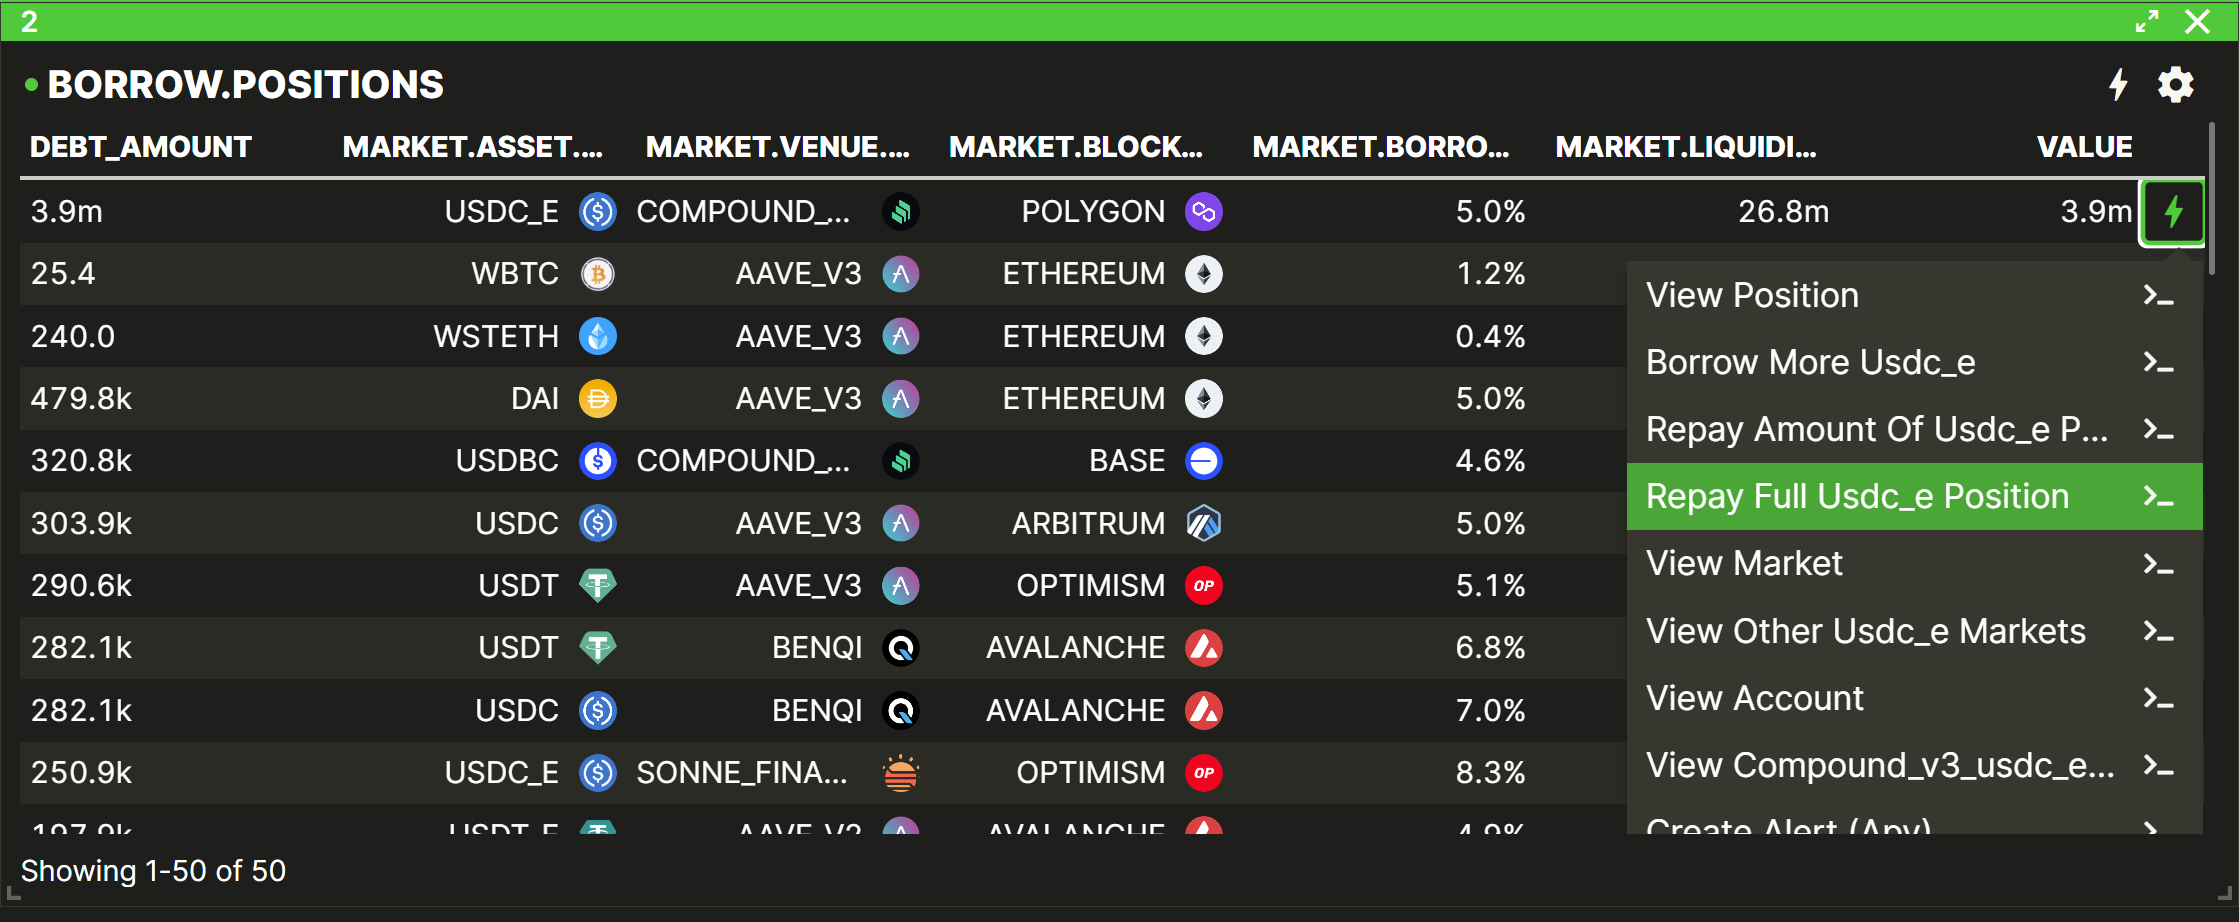
To repay a Borrow Position, you can repay either part of the position...


...or the whole position:
Likewise, you can easily reduce your LP position liquidity with the same method.
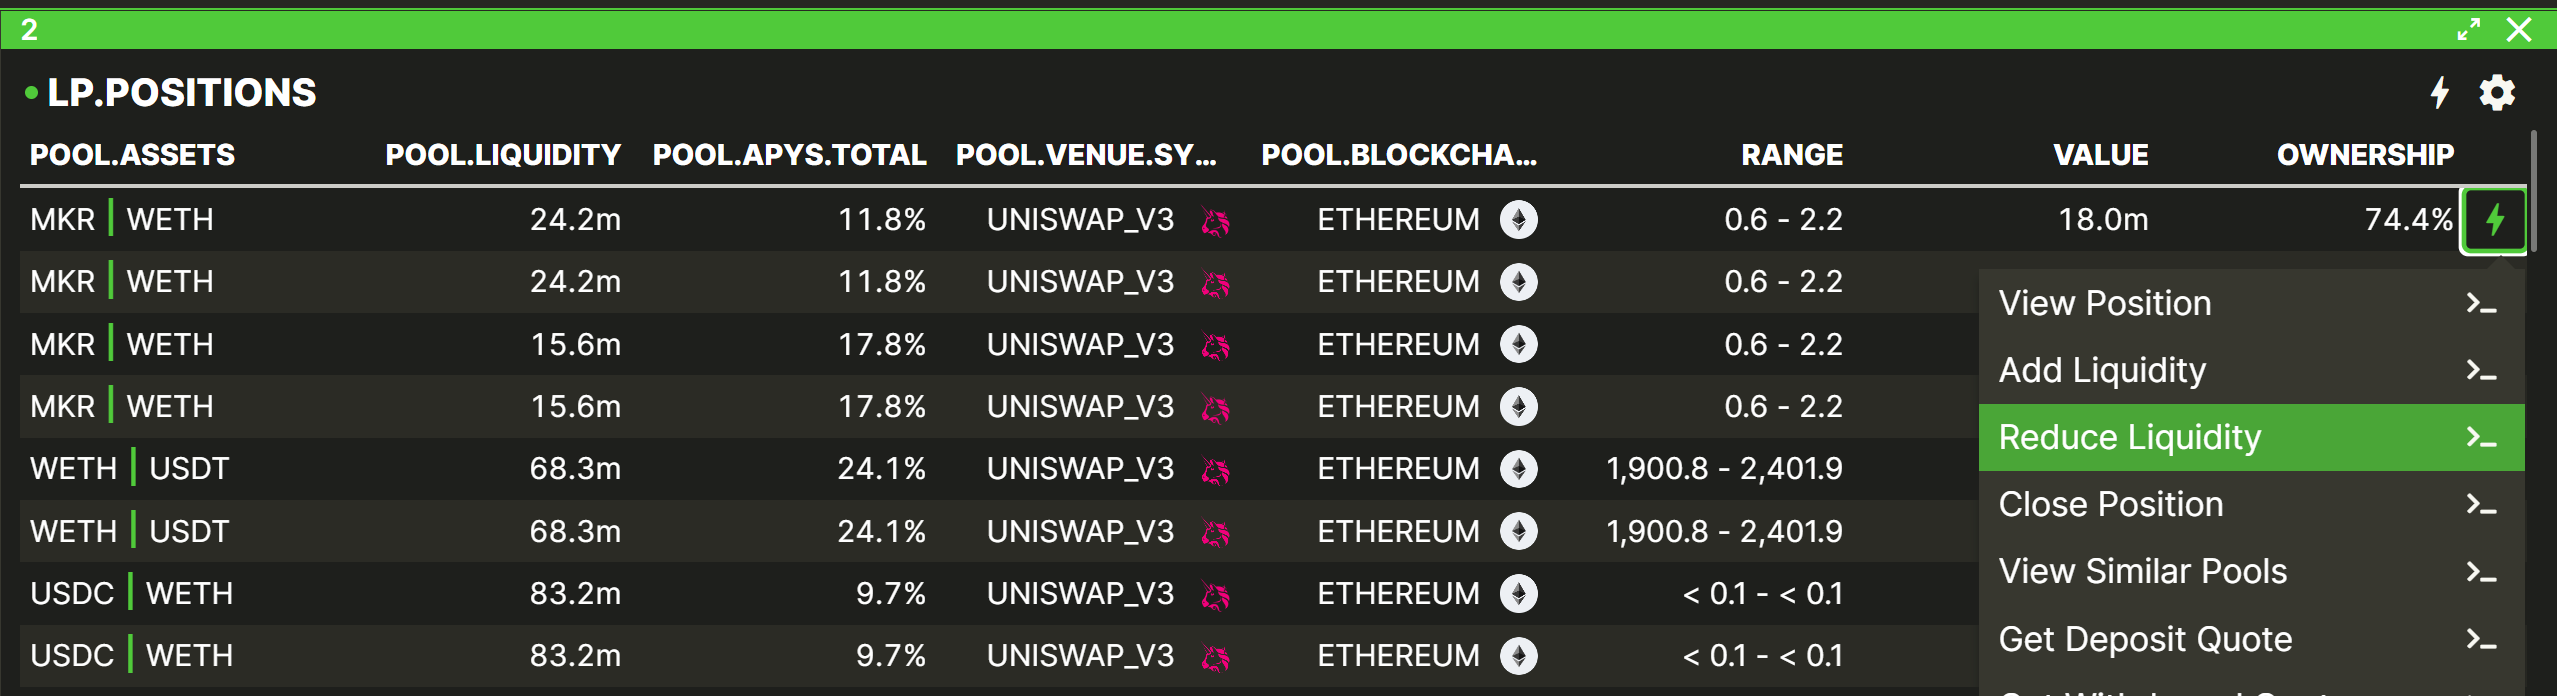
Select the amount and asset that you want to withdraw.

Step 9: Create some formulaic alerts
Vektor offer a powerful Formulaic Alerts feature that let's you create automatic notifications based on any arbitrary conditions on DeFi.
While it's possible to make very bespoke multi-criteria conditions, you can also create some simple alerts without much effort using the Quick Actions.
- Open a list component, and select some of the Alerts options in its Advanced Quick Actions:
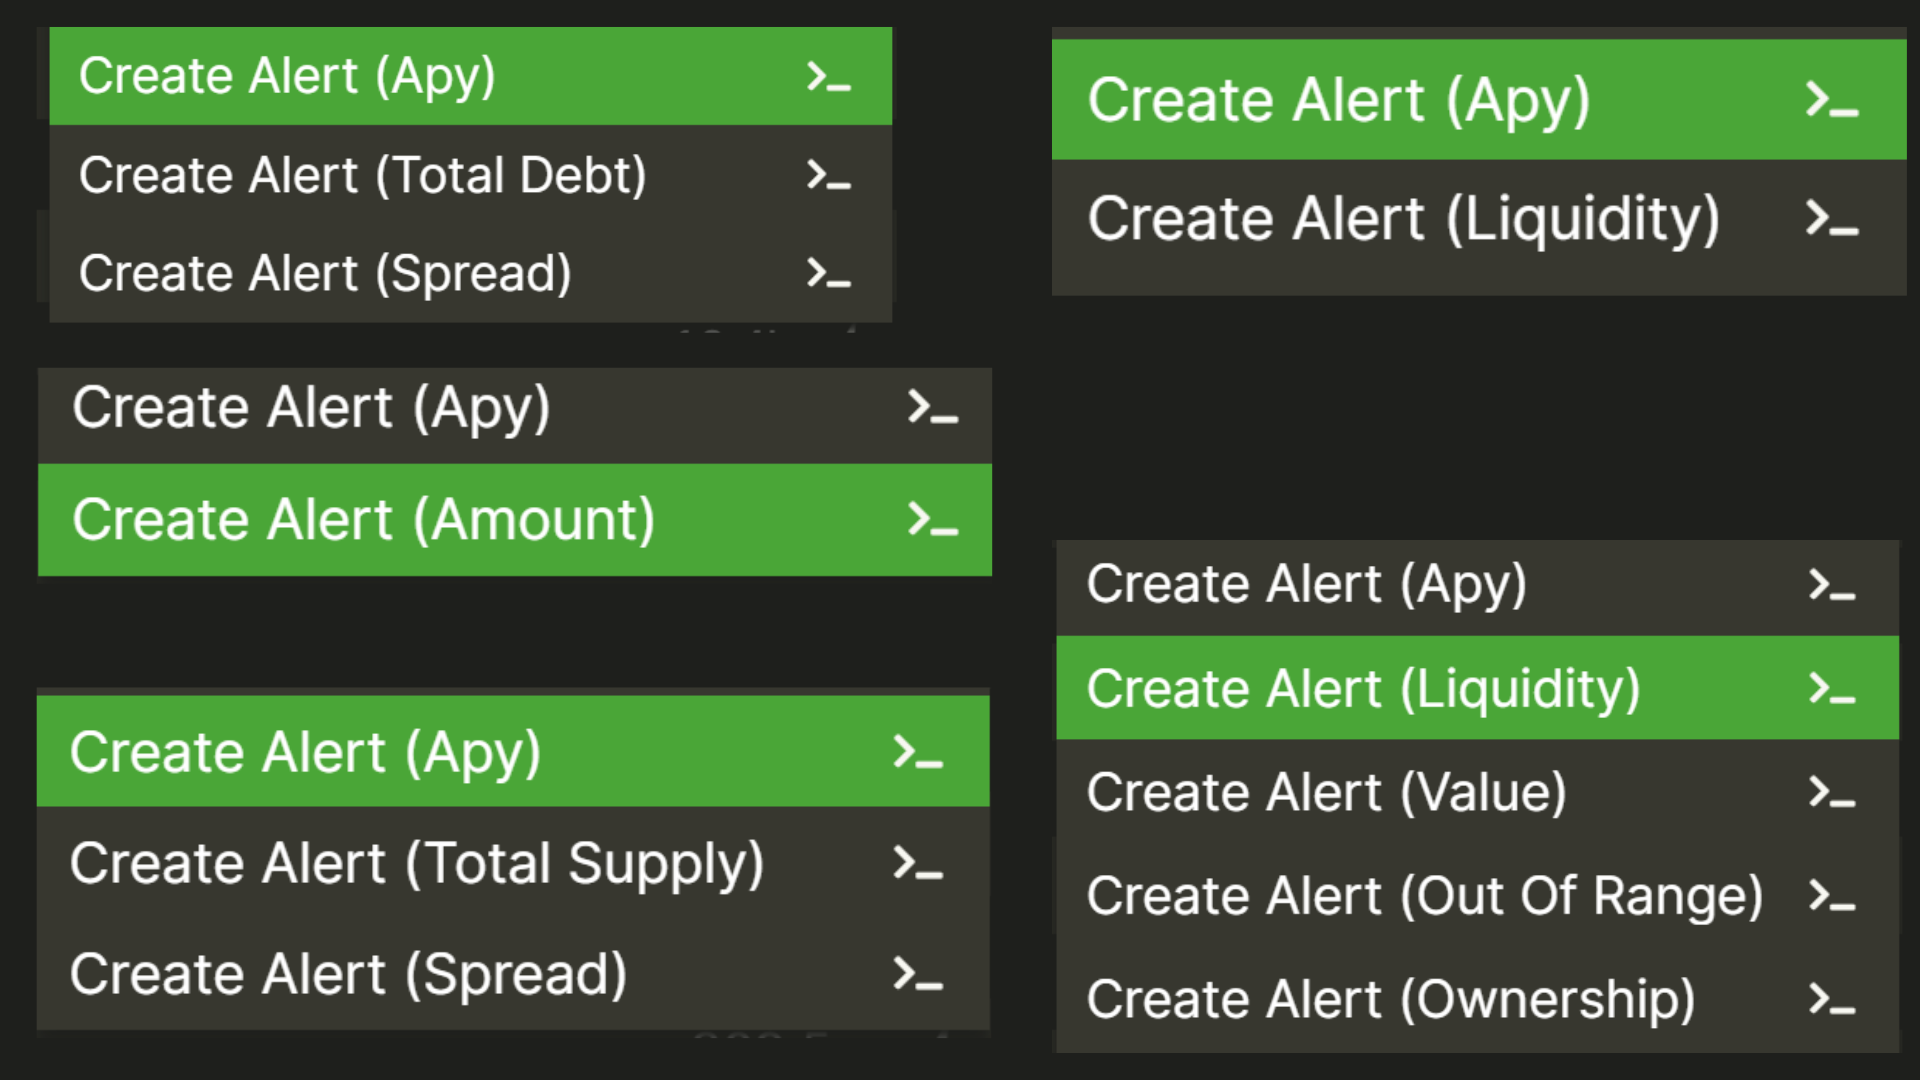
- Complete the parameter that you choose (e.g. APY trigger amount or Liquidity trigger amount) and hit
Enter
Vektor will constantly check this condition and, if and when it becomes TRUE, will send you a notification.

Step 10: Work with Vektor's data model
Now we're getting to the more Advanced stuff. Everything you see in Vektor adheres to a structured data model. You can use this to your advantage by extracting and processing data in useful ways. Here are some techniques:
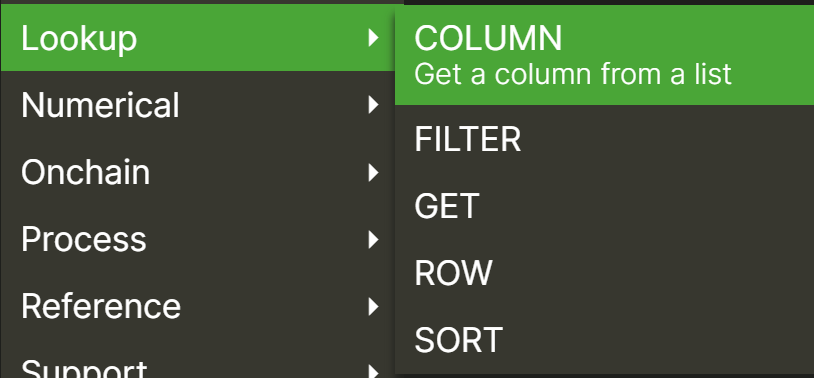
Lookup functions
In the functions menu from the App Toolbar, you will find the lookup functions: Column, Get, Row, Sort, and Filter.
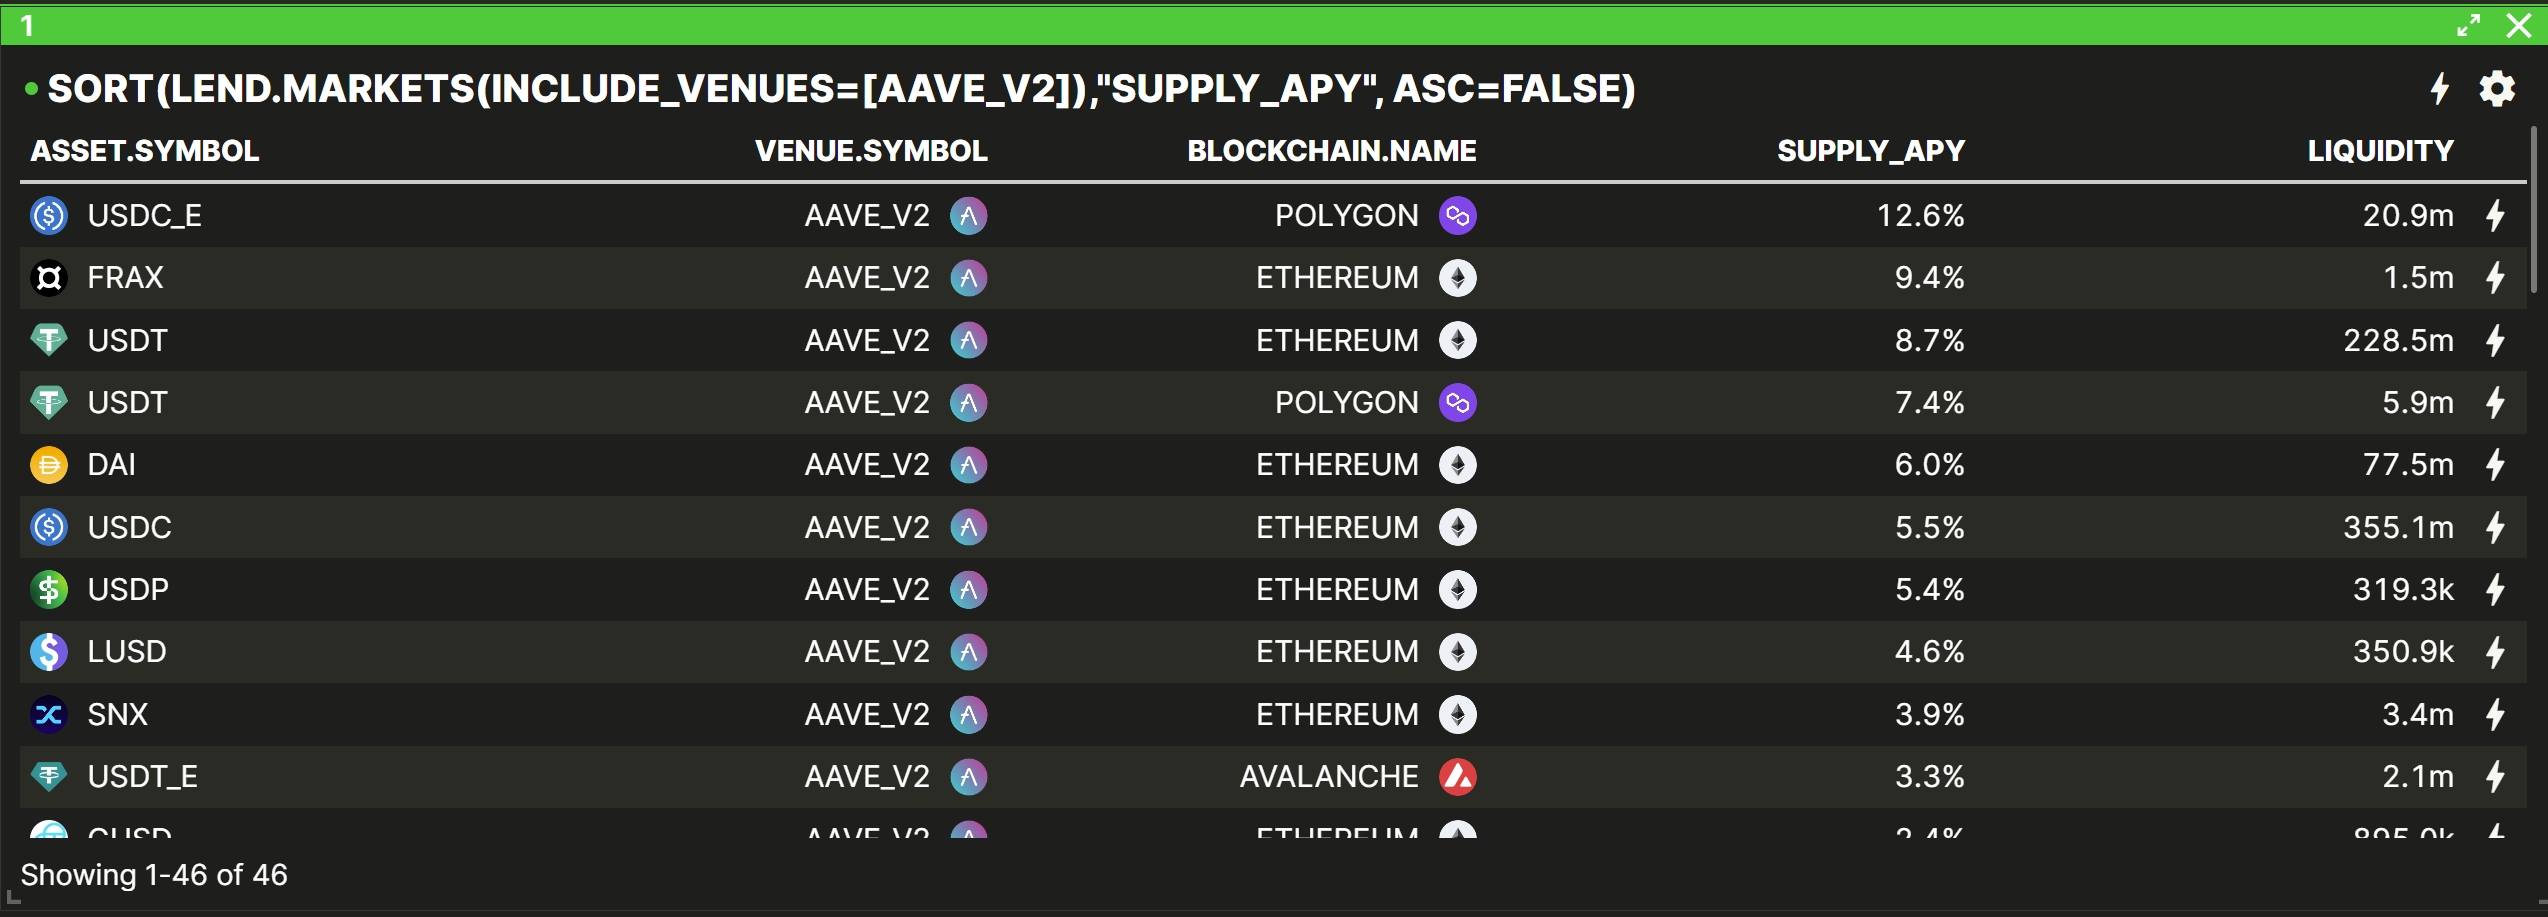
With the SORTfunction, you can sort a component list by any column. For example, lets display an AAVE_V2 lend market list ordered by APY (highest first).
SORT(LEND.MARKETS(INCLUDE_VENUES=[AAVE_V2]),"SUPPLY_APY", ASC=FALSE)
With the COLUMN function, you can extract a specific column from a list. For example, let's get the Supply APY column of the lend markets.
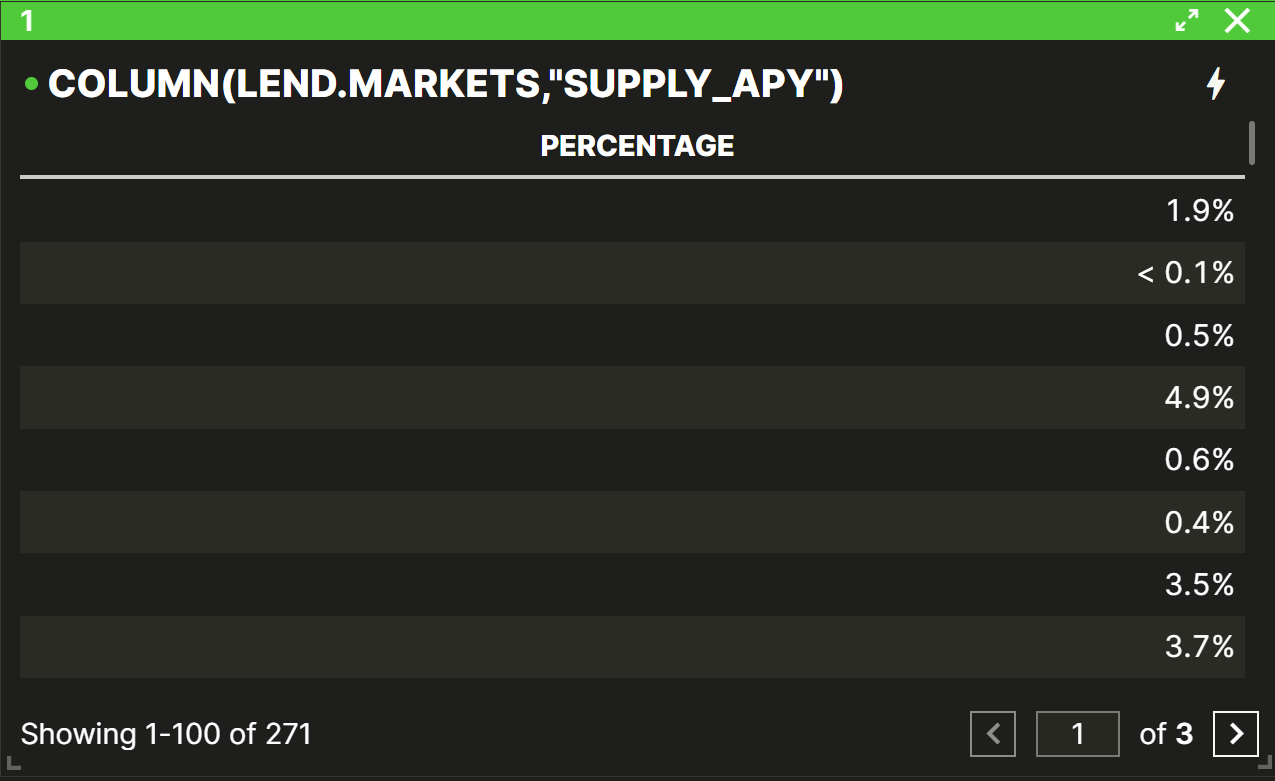
An alternative way to use the COLUMN function is with dot notation i.e. adding a. at the end of a list and writing the name of the column:
LEND.MARKETS.SUPPLY_APY
You can also combine COLUMN+ SORT :
COLUMN(SORT(LEND.MARKETS(INCLUDE_VENUES=[AAVE_V2]),"SUPPLY_APY", ASC=FALSE),"SUPPLY_APY")
or SORT(LEND.MARKETS(INCLUDE_VENUES=[AAVE_V2]),"SUPPLY_APY", ASC=FALSE).SUPPLY_APY
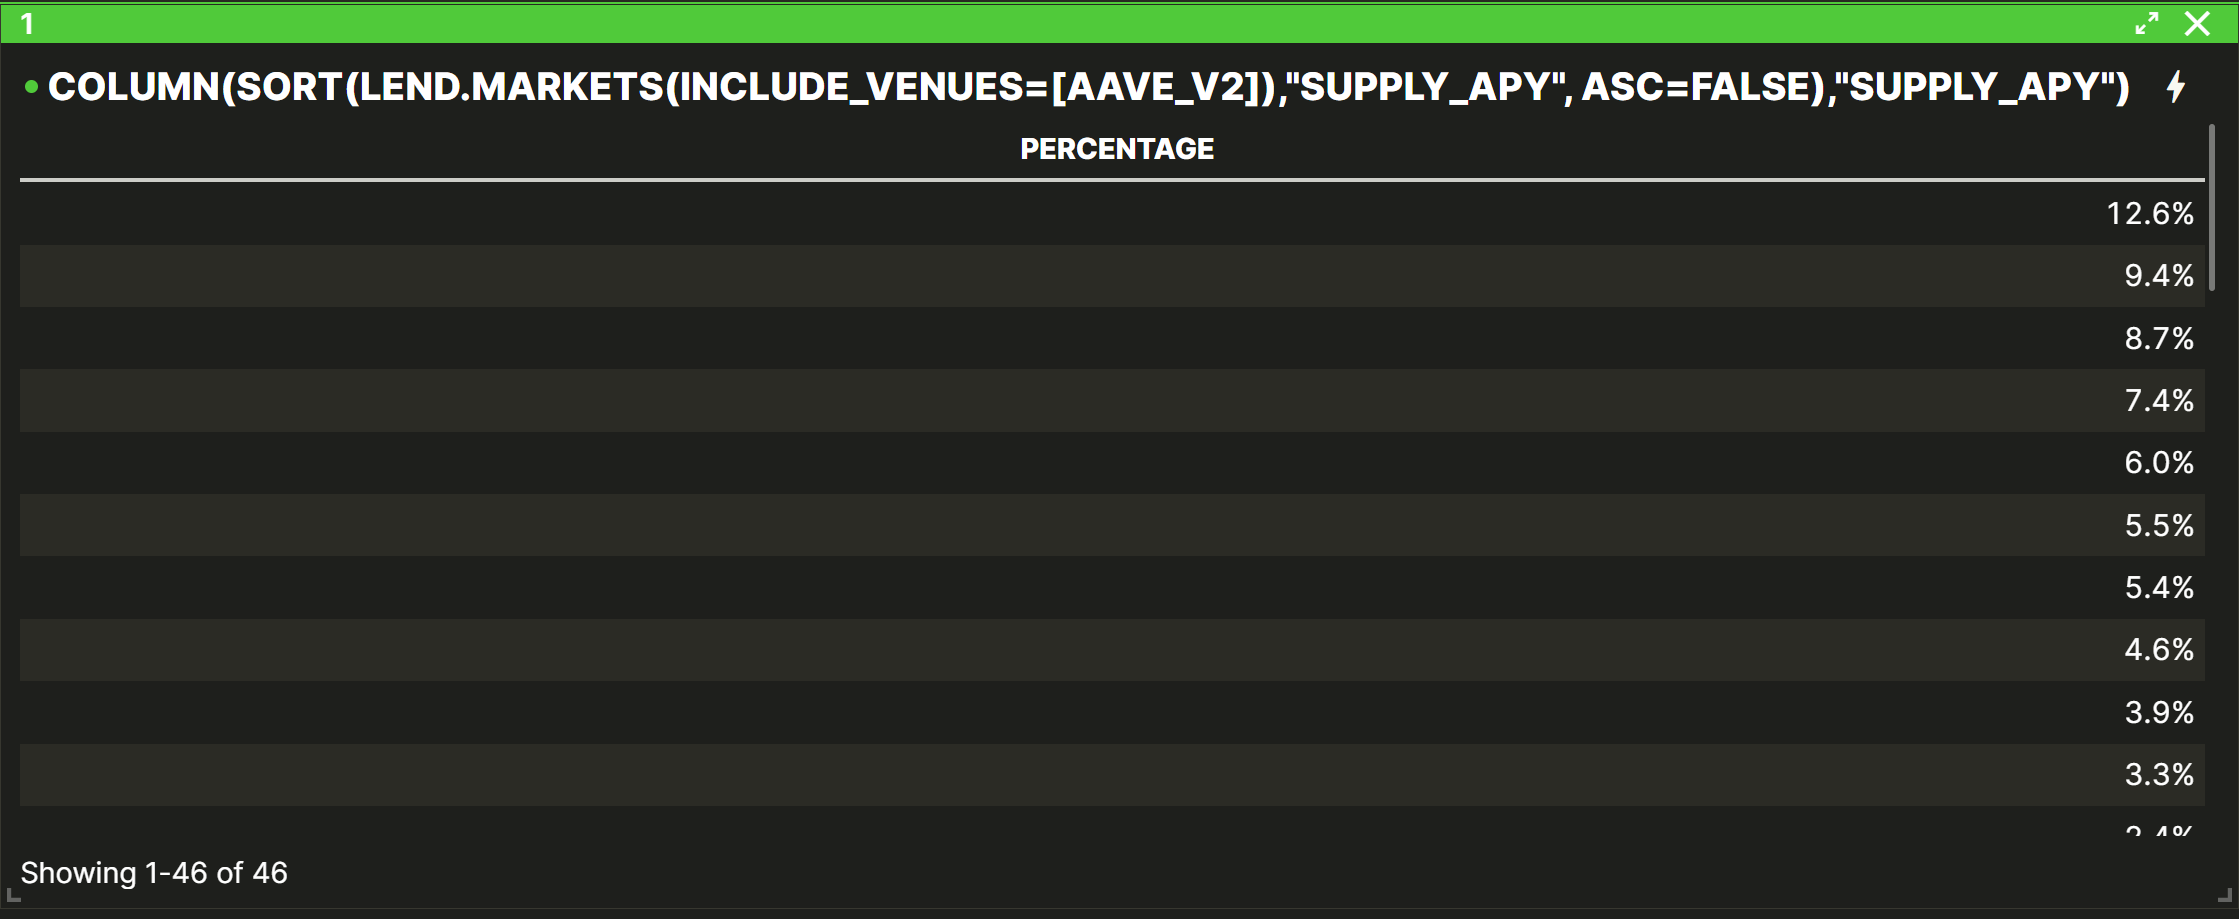
Then use other Column Functions like SUM, MIN, MAX, AVERAGE to compute aggregate values, and even build alerts on these data points!
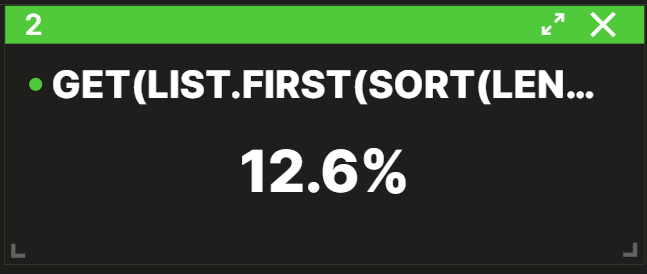
With the GET function, you can retrieve the value for a specific field if present in an object.
- For example, let's get the highest AAVE_V2 lend market APY:
GET(LIST.FIRST(SORT(LEND.MARKETS(INCLUDE_VENUES=[AAVE_V2]),"SUPPLY_APY", ASC=FALSE)),"SUPPLY_APY")
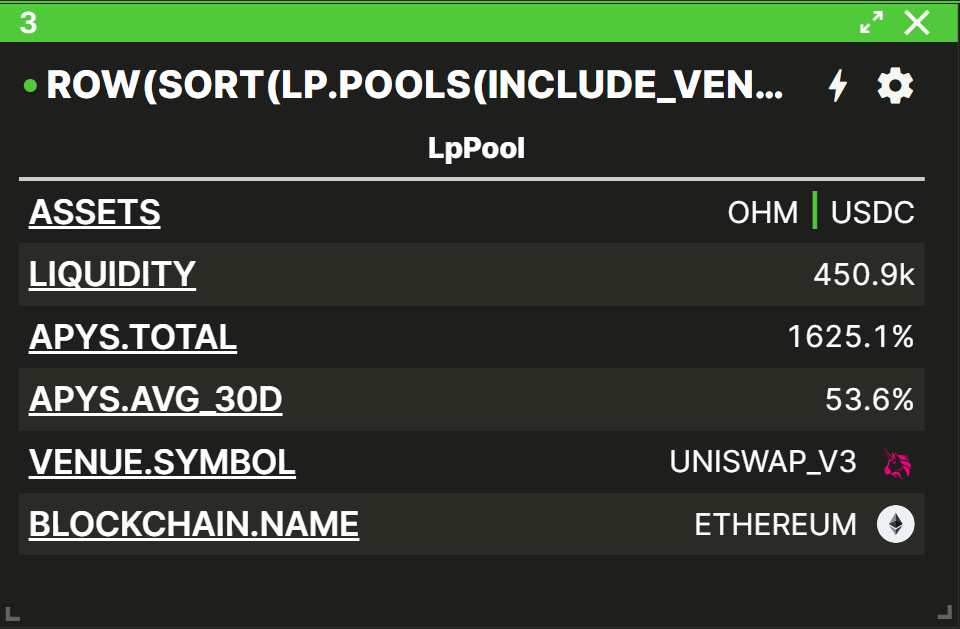
With the ROW function, you can retrieve the row of a list. Inside, you have to indicate the list and the row number. For example:
- For example: show the Uniswap_V3 Liquidity Pool with highest APY
ROW(SORT(LP.POOLS(INCLUDE_VENUES=[UNISWAP_V3]), "APYS.TOTAL",ASC=FALSE),1)
It's also possible to do general arithmetic:
1 + 2MCAP(STETH) + MCAP(ETH)SUM(BALANCES(INCLUDE_ASSETS=[USDC]).VALUE) / SUM(BALANCES.VALUE)LEND.POSITION(LINK, AAVE_V3, ETHEREUM, MY_WALLET).SUPPLIED_AMOUNT * LEND.MARKET(LINK, AAVE_V3, ETHEREUM).SUPPLY_APY
With the FILTER function, you can do very powerful filters on lists using one or several criteria. See the FILTER announcement post or spotlight documentation to learn more.
- Get a list of Curve LP Pools with Liquidity > 1M and APY > 5%
FILTER(LP.POOLS(INCLUDE_VENUES=[CURVE]), (VAL.LIQUIDITY > 1000000) AND (VAL.APYS.TOTAL > 5%))
- Find LP pools that intersects with your balances. (i.e. pools that I have eligible assets for)
FILTER(LP.POOLS, LIST.INTERSECTS(VAL.ASSETS, BALANCES.ASSET))
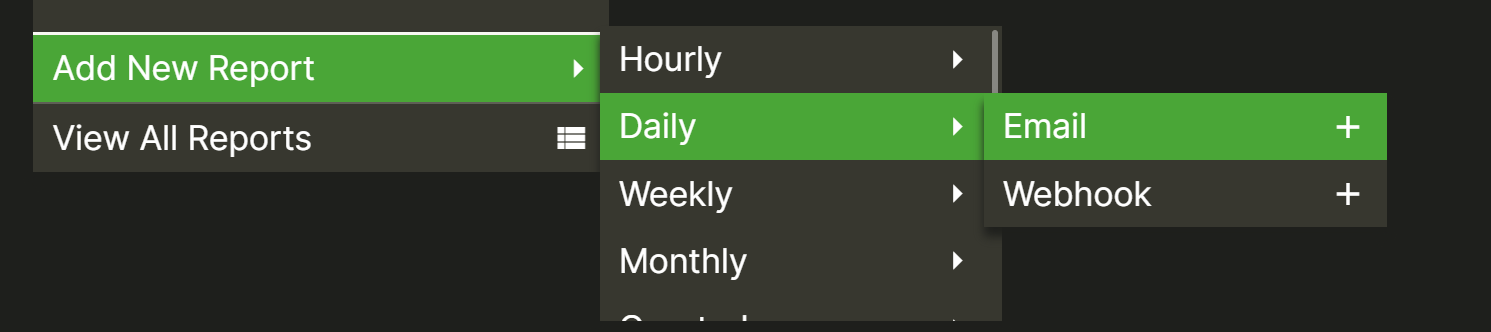
Step 11: Create scheduled Reports
Vektor's REPORT function allows you to set up daily, weekly, monthly, or custom interval period reports of any data from Vektor. We support various delivery types (e.g. email or webhook) and payloads (e.g. CSV or JSON)
To use it, you can go to the App Toolbar, open the reports menu, and select "Add New Report":
The next step is to choose the data that you want to include in the report payload.

Examples:
- Send me a email report with a CSV of my portfolio asset prices every day.
REPORT(EMAIL(MESSAGE="ASSETS PRICES REPORT", ATTACHMENTS=[CSV(PRICES(INCLUDE_ASSETS=COLUMN(BALANCES,"ASSET.SYMBOL")))]))
- Send me a Monthly report of my Lend Positions
REPORT(EMAIL(MESSAGE="LENDING POSITIONS REPORT" ,ATTACHMENTS=[CSV(LEND.POSITIONS)]),NAME="LEND POSITIONS REPORT")
If you've made it this far, Let us know! We'd love to assist you and help you develop your use cases.